
If you have chickens, then the chances are good that you’ll have to deal with bumblefoot at some point. Bumblefoot is a common staph infection that can develop after a simple cut to a chicken’s foot pad. If left untreated, this can develop into an abscess and eventually death in severe cases, so early intervention is essential.
We’ve successfully treated over 30 cases of bumblefoot throughout our years of chicken keeping. I’m confident that I can help you treat any case of bumblefoot that may be troubling your flock, and learn how to prevent it from happening again.
Let’s jump in!
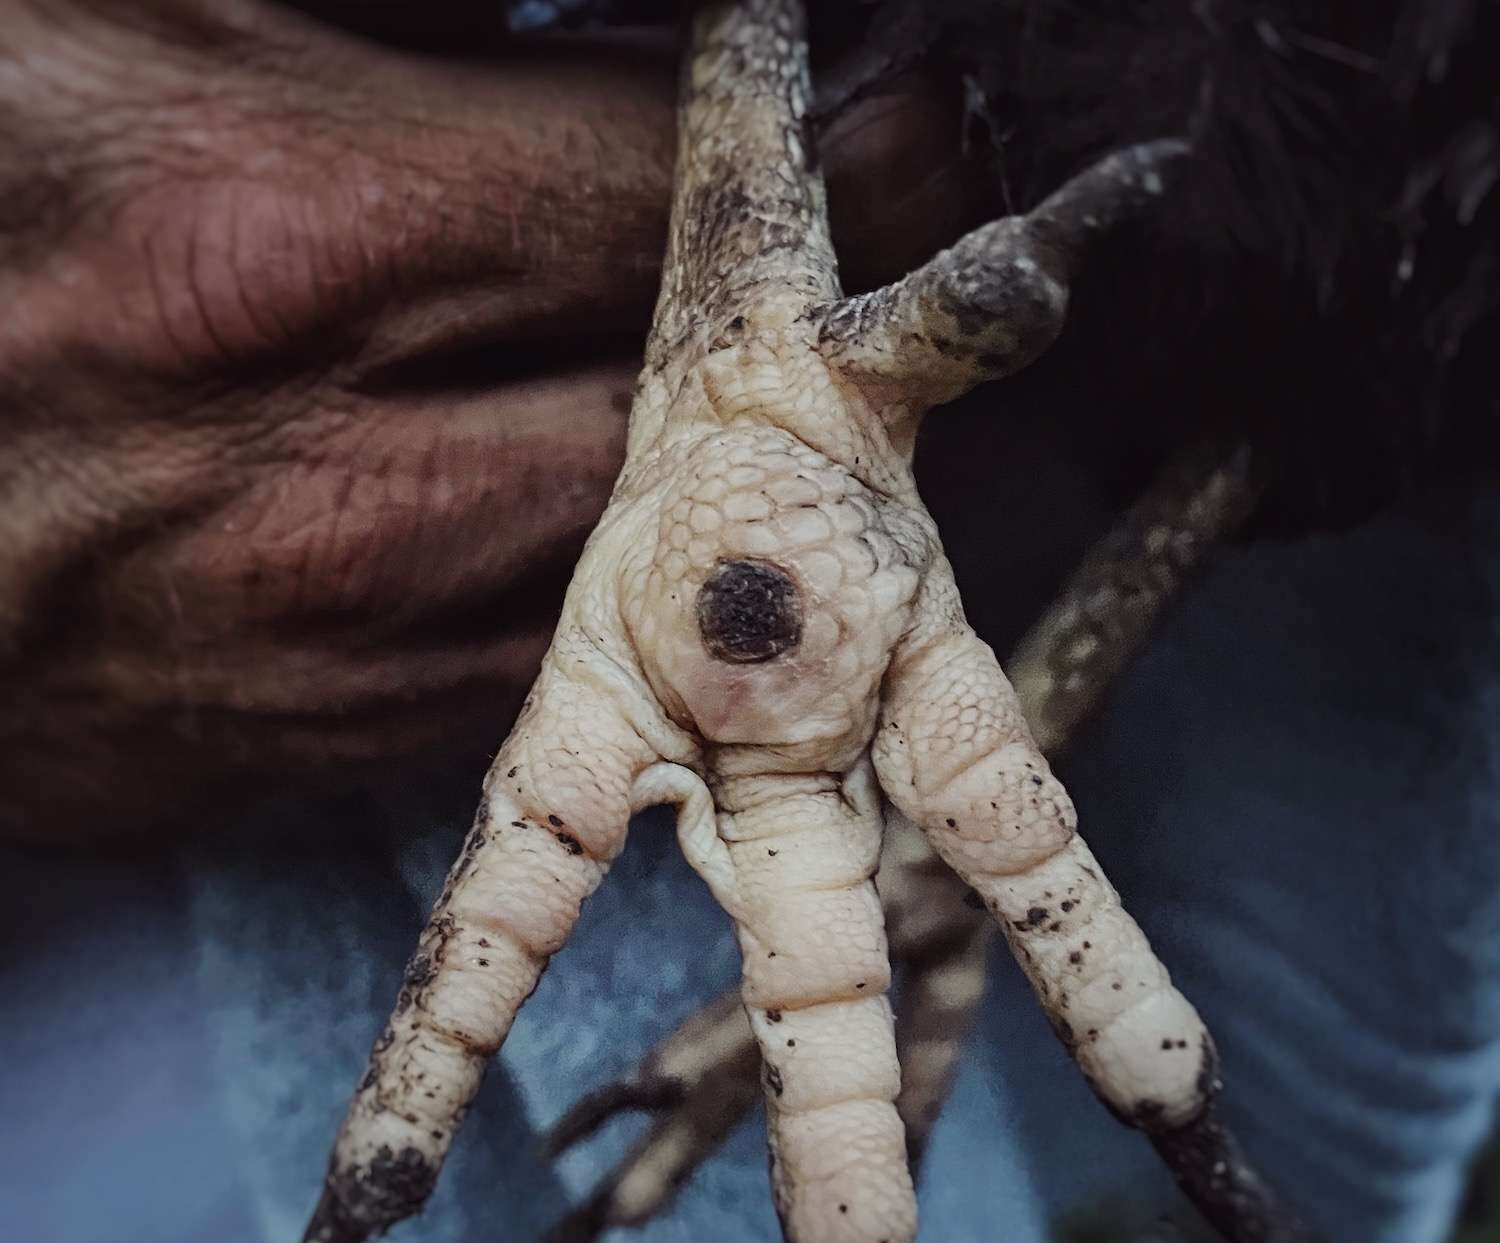
*WARNING* Graphic photos are shown in the following post.
*Disclosure: This post may contain affiliate links to products (including Amazon). I’ll earn a small commission if you make a purchase through my link, at no additional cost to you! Regardless, I only link to products that I personally use on our homestead or believe in.
What is Bumblefoot?
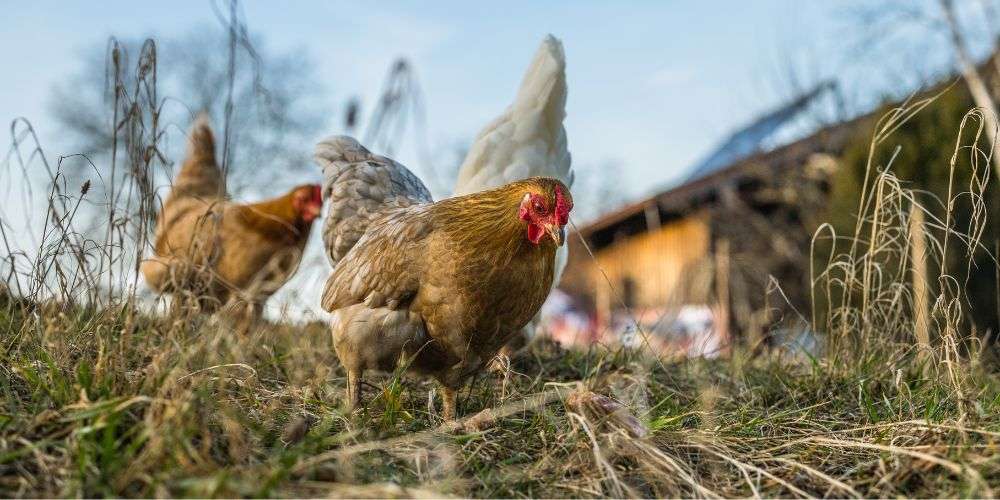
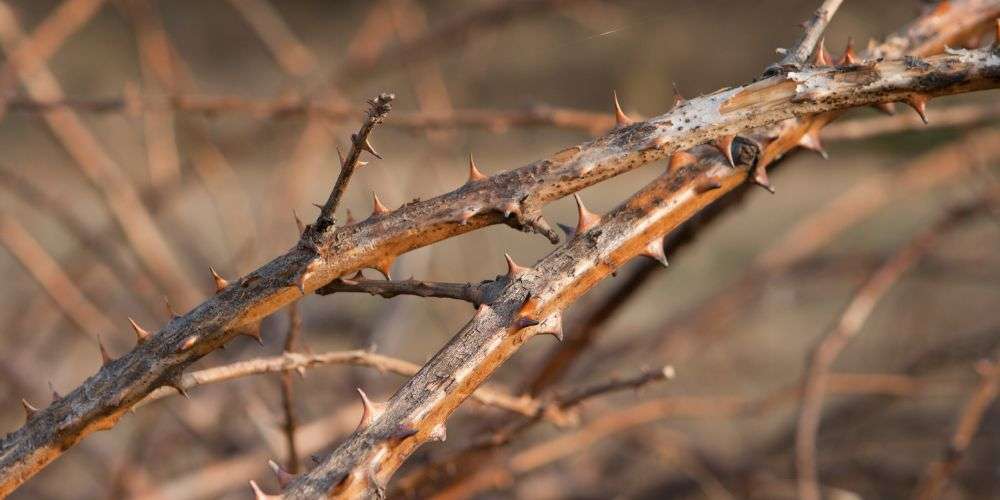
Bumblefoot is a common foot infection that starts with a simple foot injury. Chickens are busy creatures who love spending their day scratching, pecking at bugs, and jumping from high places. They’ll inevitably end up with a scratch or puncture from a stick, sharp rock, or thorn at some point.
When this injury occurs, a staph infection can fester until a full-blown abscess forms within the foot pad. The key to bumblefoot management is catching this infection before it becomes an abscess. An abscess is treatable (and I’ll show you how!), but it’s much more work and the process can be painful.
5 Stages of Bumblefoot in Chickens
Bumblefoot exists on a scale of 1-5 with stage 1 being mild and barely undetectable whereas stage 5 is severe, grossly affects the chicken’s wellbeing, and can even be fatal.
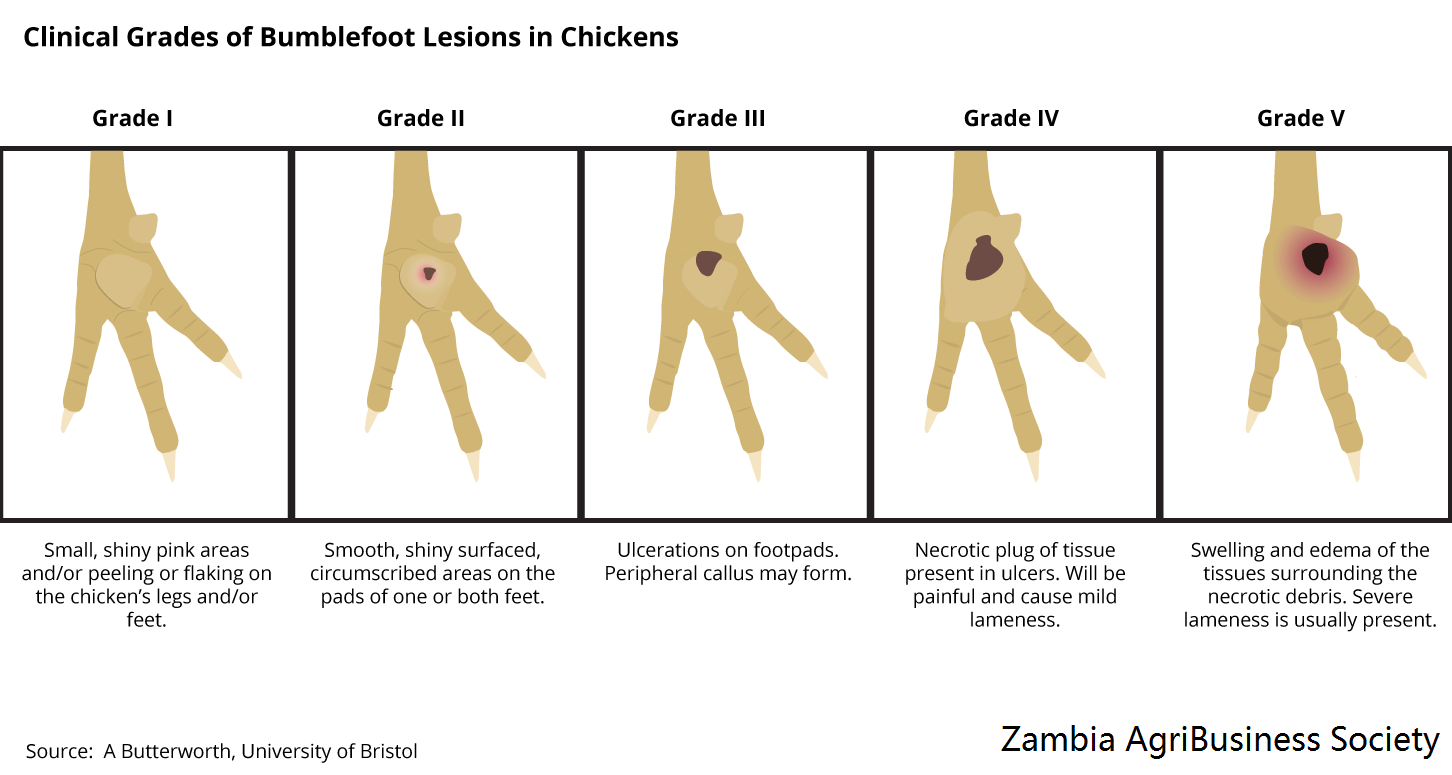
- Stage 1: You may notice a slight shiny pink area or some peeling skin. No intervention is needed at this point. Monitor and implement my prevention strategies below.
- Stage 2: The shiny pink area is more extensive now and you’ll see a small scab forming. The infection is still superficial. At stage 2, start implementing the treatment strategies.
- Stage 3: The scab is a bit larger at this stage and you’ll likely notice some callusing around the area. Intervention is absolutely necessary.
- Stage 4: There is an extensive scab that is necrotic and penetrating deep into the foot pad. Now it is quite painful for the chicken to walk on. Prompt intervention is essential.
- Stage 5: Severe progression of deep, necrotic infection that is also associated with swelling. Functionality of the foot is significantly impaired. Can be fatal if not treated immediately.
Symptoms of Bumblefoot in Chickens
Chickens are naturally stoic animals, so bumblefoot can often go unnoticed by us humans until it progresses to more advanced stages. This is why routine foot inspections are so important! Once you notice some of the symptoms below, bumblefoot has likely progressed to stage 3+.
Reduced laying
Hens stop laying eggs anytime something is “off.” They’ll halt production when it’s too hot, if they don’t have enough protein or water, when they get startled, when they are sick, etc.! It’s typically the first thing to go and an early sign, so if you notice an acute drop in laying, it’s time to do a flock inspection!
Hesitancy to use roosting bars at night
This is a classic sign that your chicken has a foot injury. Roosting bars are typically made of lumber, so they are quite firm and apply a lot of pressure to their feet at night. If you notice one of your hens prefers to sleep on the coop floor or a nesting box, inspect her feet to see if bumblefoot is the cause.
Reduced activity or favoring one foot
Once bumblefoot has progressed to the later stages of infection, it can become quite painful and cumbersome to walk on. Chickens naturally do not show pain or weakness (this is their survival strategy!), however, they can only keep a straight face for so long. Once bumblefoot has become fairly extensive, they’ll start to slow down. Poor chooks!
Swollen foot or toe(s)
When bumblefoot has become severe, you’ll be able to notice the swelling from the topside of the foot or toe. Definitely take a peek if you notice any unnatural swelling!
Causes of Bumblefoot in Chickens
The best way to prevent bumblefoot is to identify the root cause. It always starts with a foot injury of some sort while the chickens are out scratching around and going about their day:
- Hard and rocky soil
- Thorny brush – wild raspberry bushes are the main cause of bumblefoot on our homestead
- Splintered wood
- Dirty, compacted coop bedding – read about The 5 BEST Chicken Bedding Options!
- Wire-flooring or concrete
- Jumping down from high roosting bars or tree limbs – read about what should be Inside a Chicken Coop!
Then, there are secondary factors involved that can perpetuate the infection, rather than letting it heal.
- Overweight chickens
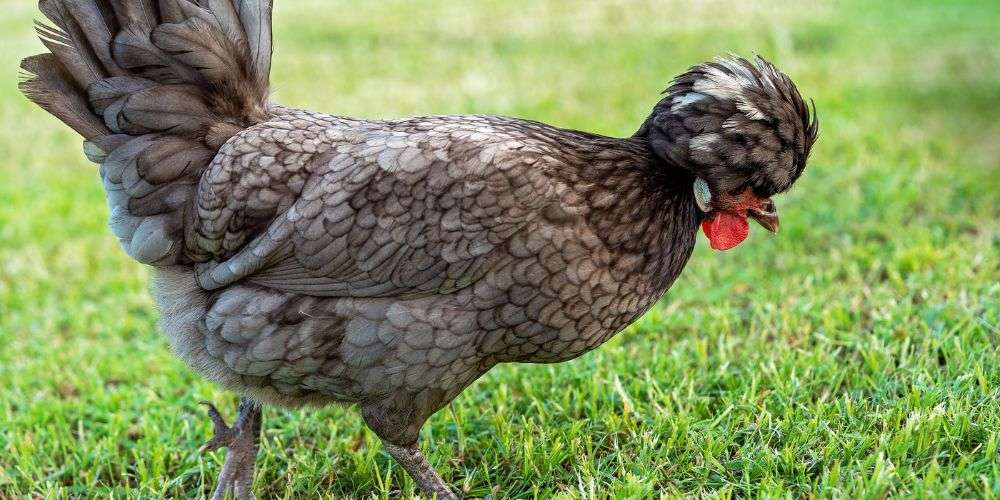
- Large, heavy breeds (typically Dual Purpose Breeds)
- Narrow roosting bars
- Splintered roosting bars
- Wet, damp conditions
- Nutritional deficiencies, especially biotin (vitamin B7)
How to Treat Bumblefoot in Chickens
The treatment strategy that you want to use will depend on the bumblefoot severity.
- If it’s in the mild stages (stages 1-2), treatment is easy and recovery is rapid.
- If it’s in the moderate to severe stages (stages 3-5), treatment can be challenging and take weeks to even months for a full recovery. This is why those monthly foot inspections are so important!
*Please note that I am not a veterinarian and this is not professional, medical advice. What follows is based on my own personal experience in treating bumblefoot over the years and from what I’ve learned from the following excellent resources: The Chicken Health Handbook and The Chicken Chick’s Guide to Backyard Chickens. I highly recommend having these resources on hand if you have chickens!
**Also, please note that while treatment by a veterinarian is preferred, I know this is not always feasible. Treatment of bumblefoot is painful for the chicken, even if they don’t show it, so be as gentle as possible. Chickens are stoic creatures and don’t show pain as their survival strategy. While it can be emotionally challenging to perform this procedure, know that without treatment, your beloved chicken will likely continue to worsen, be in pain, and may eventually perish. Do your best and get some extra help from a willing spouse, friend, or neighbor, if possible. The first few times are hard, but it does get easier. You can do this!
Mild Chicken Bumblefoot Cases
If you caught bumblefoot early, then you’re in luck! Mild cases are simple to fix and shouldn’t take more than a few treatments. I would consider a mild case to be where there is a smooth pinkish area or a small scab, but there is no widespread infection or abscess.
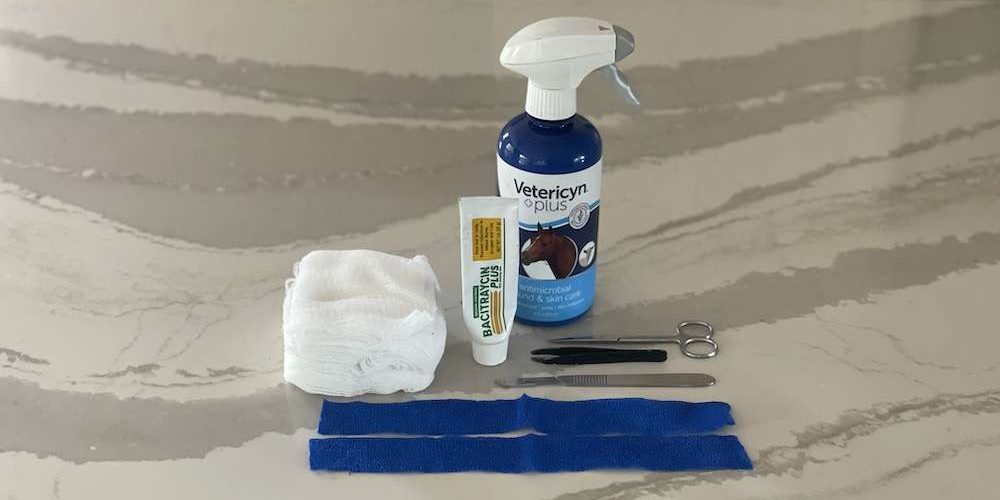
Materials
- Tweezers
- Lighter – to sterilize the tweezers between patients
- Epsom salt
- Bath towel – to wrap the chicken in to keep it still
- Vetericyn spray
- Paper towels
- Antibiotic ointment (**DO NOT use types that include pain-killers, this will KILL your chicken!)
- Gauze pad – I like the 4×4 size and then fold them into thirds to achieve a squishy, small square
- Vet wrap – I like the 4” width and cut them into thirds
- Sharp scissors
Treatment Steps
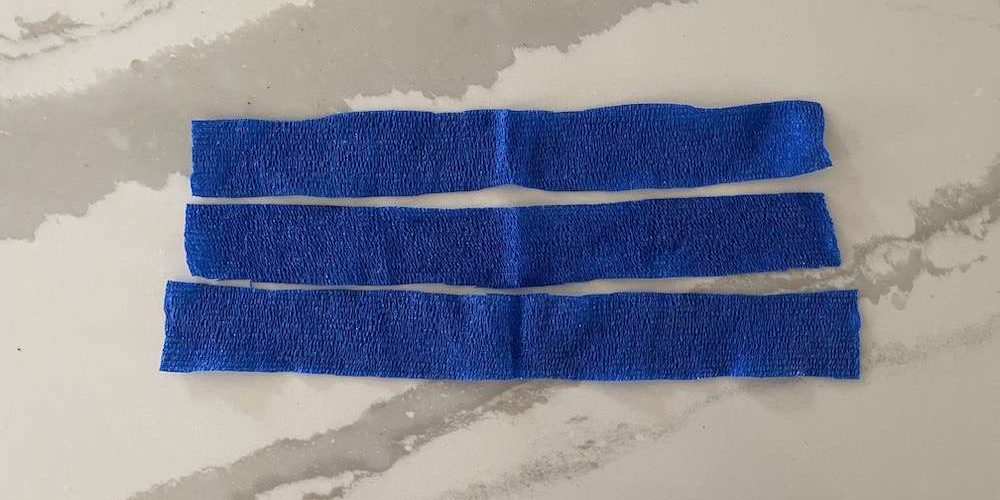
Step 1: Pre-cut strips of vet wrap. I like to cut pieces that are 12-14” long and then cut them lengthwise into thirds. *If you have bantams or small breeds, I would cut your strips into fourths.
Step 2: Restrain the chicken by wrapping it securely in a towel (like a burrito) and have your assistant hold him/her upside down, with its feet facing you. A headlamp is a great tool to wear for good lighting.
Step 3: Sterilize the tweezers with a lighter. Let cool for a few seconds. Then, gently test the scab with your tweezers. If it easily peels off, that’s great! If it’s firmly adhered, it will need to be soaked first.
Step 4: If soaking is required, add warm water to a large bucket or plastic tub until it is 2” deep (enough to cover the entire foot up to the ankle). Dissolve in a scoop of epsom salt. While the epsom salt isn’t absolutely necessary, it will help reduce inflammation and pain. Let your chicken soak its feet for 10 minutes.
Step 5: Have your assistant wrap the chicken in a towel again. Spritz the affected foot with vetericyn spray and wipe off with paper towels until clean. I prefer paper towels over a bath towel so that I can throw them away and not spread contaminants between patients; if you have only 1 patient, a towel is fine.
Step 6A: Gently pick at the edges of the small scab with your sterilized tweezers until it lifts off.
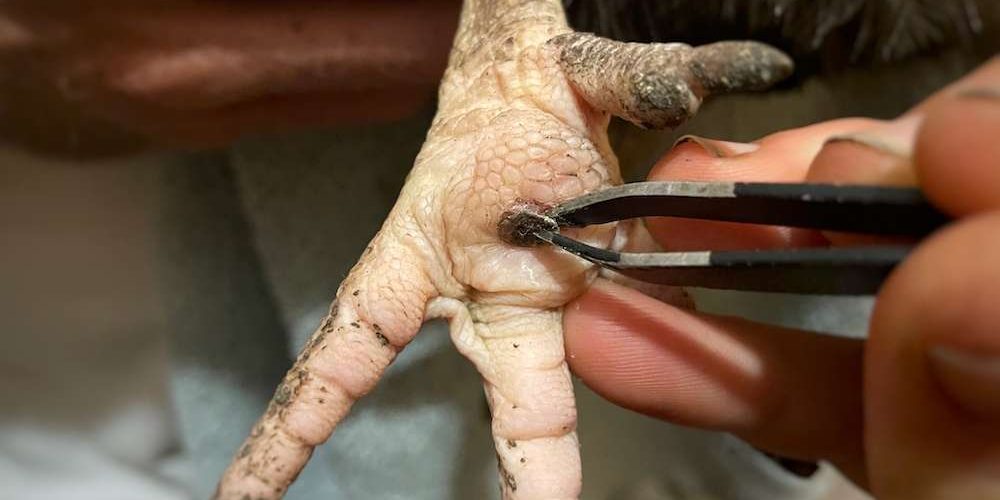
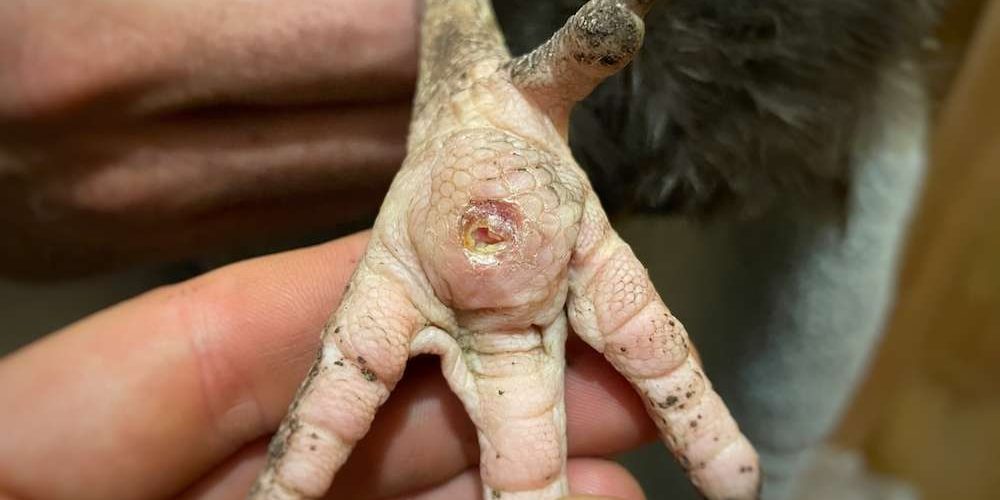
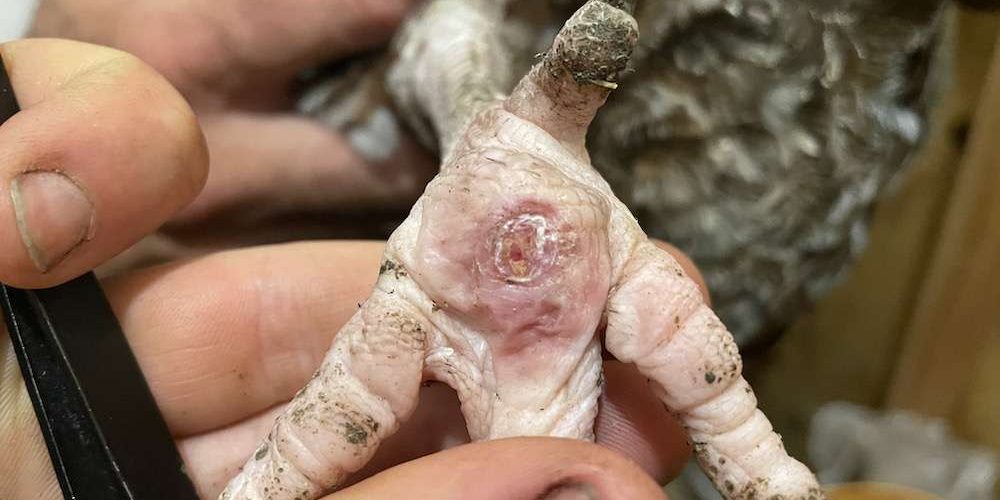
Step 6B: In mild cases, the now exposed wound base should be pink (see photo below). If it appears bloody, gooey, yellow, cheesy, or stringy…you likely have a stage 3+ case of bumblefoot (see the section below on how to proceed). This hen was originally a stage 3 that is several weeks into healing.
Step 7: Fold a 4×4 gauze pad in into thirds, twice so that you now have a small square that’s the perfect size of a chicken’s foot pad. Put a pea size dot of antibiotic ointment on it and place it on the chicken’s foot, centered over the wound.
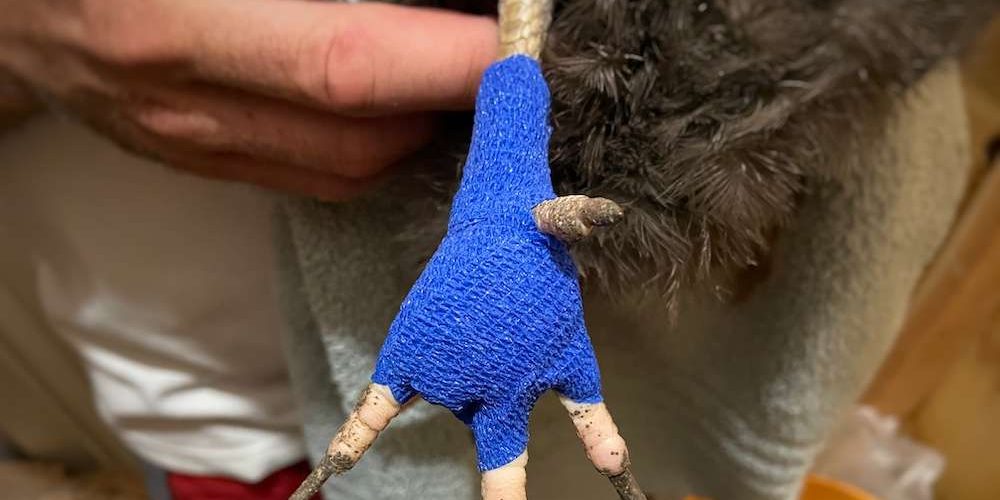
Step 8: Take one of your pre-cut strips of vet wrap and loop it around the foot twice, then secure it up around the ankle. Be careful not to wrap so tightly that circulation is impaired. Make sure to press down inside the toes so that the vet wrap is nice and sealed. Watch me wrap a chicken’s foot here on Instagram!
Step 9: Do a quick toenail check – if they are overgrown, give them a trim (dog nail clippers work great!). Chickens have a quick just like dogs do, so be careful to only take a small amount off at a time.
Step 10: After 3 days, remove the bandage, spray with vetericyn, wipe clean with a paper towel, and inspect the wound. The scab should have reformed. If the scab is loose and ready to come off, then peel it off. However, I’ve found it usually takes about a week for it to loosen up, so I typically remove it on every other bandage change. Replace with a fresh gauze pad, antibiotic ointment and vet wrap.
Step 11: Continue this process until the scab is completely gone and the skin is nice and smooth. Don’t rush it at the end! I know you are eager to be done, but if there are any ragged edges left from the wound, dirt and bacteria will get trapped in there and before long you’ll be back to square one.
*Do I need to separate my chicken? No, it’s actually best if they stay out in the coop with the flock. Chickens are social creatures and bumblefoot treatment can take months. As long as the foot remains wrapped and cleaned regularly, they’ll be on the road to recovery.
The Homesteading RD's Product Picks | |
 | I'm stil using my old tweezers from college, but if I were to buy one, THIS would be it! I love all of the different tip edges, so that you can pick and choose the best angle to work that bumblefoot scab. |
 | If you are a homesteader, you likely already have this on hand. But, if you don't... you'll want to get this ASAP! Great for use on all animals and for wounds large and small. A definite need when treating bumblefoot! |
 | This is my favorite antibiotic ointment to use on my animals and it's what I've been using for years. Nothing fancy here. Super effective. No painkillers (this ingredient will kill your chickens). |
 | This is the same pack of sponges that I use and it works super well. I like that the sponges aren't individually wrapped - less wrappers to deal with. They are inexpensive, the perfect size (when folded in half, twice) and don't stick to the wound. |
 | I know a pack of 12 seems huge, but you won't regret it. They are $4 a pop at my feed store and here you can get them for just over $1. I feel like my animals are constantly trying to find ways to kill themselves, so I'm always reaching for this stuff! |
Moderate to Severe Chicken Bumblefoot Cases
If your chicken has a moderate or severe case of bumblefoot (stages 3-5; see above section if you missed it!), that means that the wound is now infected, swollen, painful and likely has an abscessed core. Moderate or severe cases are more complex and often require surgery to remove the abscess before healing can start.
Materials
- Tweezers
- Lighter – to sterilize the tweezers between patients
- Epsom salt
- Bath towel – to wrap the chicken in to keep it still
- Vetericyn spray
- Paper towels
- Headlamp – You’ll want bright, direct light to get a good view into the foot wound
- #10 Scalpel
- Antibiotic ointment –**DO NOT use types that have pain-killers included, this will KILL your chicken!)
- Gauze pad – I like the 4×4 size and then fold them into thirds to achieve a squishy, small square
- Vet wrap – I like the 4” width and cut them into thirds
- Sharp scissors
Treatment Steps
Step 1: Pre-cut your strips of vet wrap. I like to cut pieces 12-14” long and then cut lengthwise into thirds. If you have bantams or small breeds, I would cut your strips into fourths.
Step 2: Restrain the chicken by wrapping it securely in a towel (like a burrito) and have your assistant hold him/her upside down, with its feet facing you. A headlamp is a great tool to wear for good lighting.
Step 3: Sterilize the tweezers with a lighter. Let cool for a few seconds. Then, gently test the scab with the tweezers. If it easily peels off, that’s great! If it’s firmly adhered, it will need to be soaked first.
Step 4: If soaking is required, add warm water to a large bucket or plastic tub until it is 2” deep (enough to cover the entire foot up to the ankle). Dissolve in a scoop of epsom salt. While the epsom salt isn’t absolutely necessary, it will help reduce inflammation and pain. Let your chicken soak its feet for 10 minutes.
Step 5: Have your assistant wrap the chicken in a towel again while you work on its foot. Spritz the affected foot with vetericyn spray and wipe off with paper towels until clean. I prefer paper towels over a bath towel so that I can throw them away and not spread contaminants between patients; if you have only 1 patient, a towel is fine.
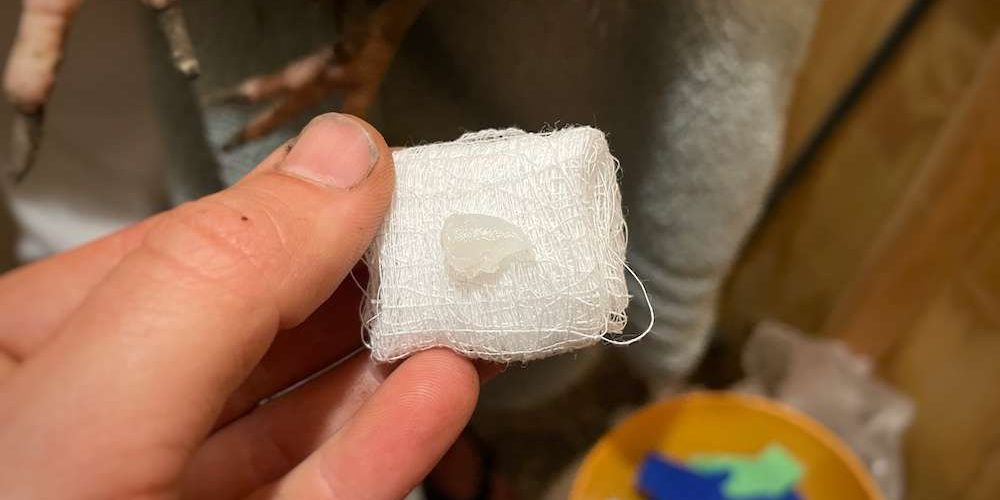
Step 6: Gently pick at the edges of the small scab with your tweezers until it lifts off. In these more severe cases, it might need some firm pulling to come off and will likely be bloody. Keep those paper towels handy! If you’re lucky, the abscess core will lift off with the scab like a plug. That’s the best outcome!

Step 7: If the scab is off and the abscess core did not come out (it typically looks yellow and waxy), you will need to dig deeper to get it out. Yep, sorry. If the abscess core doesn’t come out, the foot won’t heal and will only continue to fester.
*If the scab won’t come off in the first place, you will need to use your #10 scalpel -> skip to step #9 to see what to do.
Step 8: To get the abscess out (if it didn’t come out with the scab), start by making sure your headlamp is on so that you have good lighting. Dab out any blood with a paper towel, give it another spray with vetericyn, and take a good look. If you see anything that looks stringy, yellow, waxy or gooey, it needs to come out. I usually start by seeing if I can just pull it out with the tweezers. You’ll know it’s all out when you can see pink, healthy tissue throughout the wound cavity.
Step 9: If the tweezer trick didn’t work, it’s time to get out your #10 scalpel. Take a deep breath, spray the area with vetericyn again, and then cut straight down into the foot pad, around the outer circumference of the wound to get a clearer entrance to the area. Continue to dab the blood and spray vetericyn as needed as you work. Carefully pull out the abscess core with your tweezers. You may need to squeeze the foot pad a bit to loosen things up. Sometimes it’s not entirely clear if you’re done or not, which can be stressful. You can always reassess at your next foot cleaning in 3 days and do further debridement if needed.
Step 10: Have your partner hold pressure on the foot pad with a paper towel to control the bleeding, if needed. Fold a 4×4 gauze pad in into thirds, twice so that you now have a small square that’s the perfect size of a chicken’s foot pad. Put a pea size dot of antibiotic ointment on it and place it on the chicken’s foot, centered over the wound.
Step 11: Take one of your pre-cut strips of vet wrap and loop it around the foot twice, then secure up around the ankle. Be careful not to wrap so tightly that circulation is impaired. Make sure to press down inside the toes so that the vet wrap is nice and sealed.
Step 12: Do a quick toenail check – if they are overgrown, give them a trim (dog nail clippers work great!). Chickens have a quick just like dogs do, so be careful to only take a small amount off at a time.
Step 13: After 3 days, remove the bandage, spray with vetericyn, wipe clean with a paper towel, and inspect the wound. The scab should have reformed. If the scab is loose and ready to come off, then peel it off. However, I’ve found it usually takes about a week for it to loosen up, so I typically remove it on every other bandage change. Yes, you do need to remove the scab. If there’s still some trapped infection or part of an abscess kernel in there, you’ll want to know and be able to get it out. I know it seems backward since we’ve always been told not to “pick at our scabs”, but in the case of deep wounds with infection, it needs to remain open until it’s fully healed.
Step 14: Replace with a fresh gauze pad, antibiotic ointment and vet wrap.
Step 15: Continue this process until the scab is completely gone and the skin is nice and smooth. Don’t rush it at the end! I know you are eager to be done, but if there are any ragged edges left from the wound, dirt and bacteria will get trapped in there and before long you’ll be back to square one.
*Do I need to separate my chicken? No, it’s actually best if they stay out in the coop with the flock. Chickens are social creatures and bumblefoot treatment can take months. As long as the foot remains wrapped and cleaned regularly, they’ll be on the road to recovery.
**If you are super nervous about doing bumblefoot surgery, watch some YouTube videos on it before you try. There are some great videos out there and I definitely watched a few before I did it myself.
The Homesteading RD's Product Picks | |
| | I'm stil using my old tweezers from college, but if I were to buy one, THIS would be it! I love all of the different tip edges, so that you can pick and choose the best angle to work that bumblefoot scab. |
| | If you are a homesteader, you likely already have this on hand. But, if you don't... you'll want to get this ASAP! Great for use on all animals and for wounds large and small. A definite need when treating bumblefoot! |
 | I know that a surgical scalpel seems scary, but you can do this! It's not always required, but you might need it for severe cases, so it's good to have on hand. |
| | This is my favorite antibiotic ointment to use on my animals and it's what I've been using for years. Nothing fancy here. Super effective. No painkillers (this ingredient will kill your chickens). |
| | This is the same pack of sponges that I use and it works super well. I like that the sponges aren't individually wrapped - less wrappers to deal with. They are inexpensive, the perfect size (when folded in half, twice) and don't stick to the wound. |
| | I know a pack of 12 seems huge, but you won't regret it. They are $4 a pop at my feed store and here you can get them for just over $1. I feel like my animals are constantly trying to find ways to kill themselves, so I'm always reaching for this stuff! |
How to Prevent Bumblefoot in Chickens
Thankfully, there are some things that you can do to reduce the risk of your flock developing bumblefoot. Let’s check them out!
#1 Engage in monthly foot inspections
If you only do one thing, choose monthly flock inspections. By doing this, you’ll be able to catch bumblefoot in the early stages when it’s much easier to treat. You’ll also be able to identify other flock issues like toenails that need clipping, injuries, mites or lice.
#2 Lower roosting bar height
If the roosting bars are too high, then there can be significant pressure on the foot when landing. If there’s a dried or frozen piece of poop (or anything else sharp), this can lead to foot injury…and then bumblefoot. To prevent this, ensure that all of your roosting bars are no taller than 18” tall.
#3 Use 2×4’s for roosting bars
We started with 2×2’s for our roosting bars, per my chicken book’s recommendation. However, over the years, we’ve realized that this was a poor recommendation for several reasons.
First, frost-bitten toes are a common occurrence during our brutal Minnesota winters that can reach -40 degrees! With the 2×2’s, their poor toes were curling down past their feather coverage and getting frostbite. Since switching to 2×4’s, it’s been much better since their feet rest flat on top and can be fully covered by their feathers.
Second, there is much more pressure on the foot pad when using 2×2’s, which can make foot injuries much more challenging to heal.
#4 Maintain clean bedding
I know it’s a pain to clean out the coop and buying new bedding can get expensive, but it is so important! Chicken poop can become hard once it dries out and in the winter, frozen poops can become especially sharp. Engage in routine coop cleanout days and keep bedding deep, light, and dry.
#5 Avoid wire flooring
While wire flooring is less common in the homesteading world, it’s still important to talk about. Wire flooring can be sharp and apply a lot of pressure to the foot. This can be especially bad if space is limited and chickens are standing in one place for a prolonged period. Stick with soft, deep bedding with straw, sand, or pine shavings.
#6 Remove sharp items
Some of these items are easy to implement, others may be nearly impossible. Just do your best here and of course, keep up with your monthly foot inspections!
Sand down roosting bars and remove splinters
This is an easy step and something you should be checking for at least yearly. Overtime, the roosting bars can wear down, leaving the grain exposed. Sometimes the wood can splinter as it dries throughout the years as well.
This is what led to our terrible round of bumblefoot in 2021. I failed to notice that the raised grain of our roosting bars had become fairly sharp! We quickly sanded them down and now they are smooth as butter.
Keep the yard cleaned up
This is a good practice to do, for the welfare of all on the homestead. Keep extra rolls of chicken wire tucked away somewhere safe (that stuff can be incredibly sharp!), clean up nails/screws after working on projects, and don’t leave anything else sharp like barbed wire laying around.
Remove thorny brush
This is the most challenging one. If you live on a homestead like mine with THOUSANDS of thorny plants scattered over several acres, it may not be possible to address unless you want to clear-cut everything.
After implementing all of the strategies above, I am still getting bumblefoot because of all of our thorny brush that the chickens love foraging in. I’ve had to come to peace with this.
Yes, I could just keep them locked in the coop/run all day for full protection, but that’s not what we’re about here. The chickens LOVE their free-ranging days and I love the high-nutrient content of their eggs when they do.
Remove rocks
If you live in a rocky area, this one is equally as challenging to eliminate. Rocks can be quite sharp and cause injury. Do your best to flip over any obvious sharp areas or remove likely targets. If you have an area that is particularly bad, you could consider fencing this off to keep the chickens out.
#7 Keep hens a healthy weight
Yes, chickens can become overweight just like humans! Not only are they prone to more health conditions when they are overweight, but they can get foot injuries as well. That’s due to the increased weight on their small foot surface area as they scratch and jump down from their roost. Keep treats at a minimum and encourage daily foraging/activity.
#8 Consider smaller breeds
This one makes a big difference! My largest hens always have the worst cases of bumblefoot (I’m looking at you, dual purpose breeds!). This is due to the same case as the overweight birds that we chatted about above – there’s so much more weight coming down on their small feet. More pressure = increased risk for injury and harder to heal.
#9 Utilize a well-balanced feed
Bumblefoot can sometimes occur due to a deficiency in biotin (vitamin B7). Most commercial chicken feeds should be well-balanced, but check your nutrition label to be sure. If you are mixing your own feed, ensure that you are including a source of biotin in your mix.
FAQ about Bumblefoot in Chickens
Is chicken bumblefoot contagious?
No, bumblefoot is not contagious. It always starts from a foot injury. If one of your chickens has bumblefoot and the rest of your flock has healthy feet, they will not develop bumblefoot.
Do I need to isolate my chicken with bumblefoot?
No, and in fact I recommend that you don’t. Treatment can take weeks, or even months in severe cases. Chickens are social creatures and reintroduction after a period of being away can ruffle some feathers, so I only isolate when absolutely necessary. As long as the foot is well-wrapped and stays dry (don’t let them out on rainy days), they’ll thrive with their flock. If you have a very severe case where mobility is limited and your chicken needs help getting to food and water, then I would isolate.
What happens if you don’t treat bumblefoot in chickens?
Eventually, bumblefoot will continue to spread to the point where the chicken develops sepsis (a total body infection). Mortality is rare, but it can happen if sepsis takes over.
Where can I find a vet to help me with bumblefoot?
Unfortunately, most veterinary offices don’t service birds, but a few might be open to it! Rural vets that are used to treating a wide variety of farm animals are a better bet than one in the city. Start calling around and hopefully you can find one.
Other Articles You’ll Love
- How to Care for Chickens: A Beginner’s Guide
- Don’t Feed These Foods to Your Chickens!
- Ultimate Guide to Nesting Box Size
- Inside a Chicken Coop: 5 Required Items (and 3 to AVOID!)
Final Thoughts
Bumblefoot can be quite distressing to both the chicken and the human. I know it’s never easy to treat your own animal surgically! With practice, it does get easier over time. The key is to engage in routine foot inspections so that you can catch them early and fix it quickly.
Good luck!
*Information in this article was referenced from personal experience and/or from my favorite chicken books The Chicken Health Handbook and The Chicken Chick’s Guide to Backyard Chickens unless otherwise noted.


Hi there – regarding the aftercare – removing the bandage(s) every 3 days – we have to remove the “scab” each time – but not tweezer any longer correct?
Correct, no need to keep digging away at it if the abscess it out. If the scab is adhered, I’ll use tweezers to help peel it off.
Hi there,
I have a question and I can not find the answer anywhere. Our chicken had Bumblefoot a few weeks ago. We removed the scab carefully and it was a very mild case. So there was a little pink tissue underneath and we took care of the wound every day. It looked very well. Now the dark scab is back and I was wondering if we need to remove it again or that it is just the normal way of healing. The chicken got anti-inflammatory from the vet, so we know that the infection should be gone. Maybe you can help me.
Thanks.
If it’s a true scab that is back, yes, I would remove it and start the process over again. Otherwise, if it’s just a fresh wound bed, it might just be dirt packed in there and needs cleaned?
Excellent article! I’m not too new to chickens but I’ve been incredibly lucky because my girls have never had a health issue yet. After joining the Facebook community (where I found your page), I’ve noticed bumble foot seems to be fairly common. Your article answered all the questions I had and some I didn’t even think of. I’m very grateful to you for sharing this wealth of information that would have otherwise taken hours of research. Straight to the point and even linked the products you use! Thankyou Thankyou Thankyou!!
I’m so glad to hear that you found it helpful! 🙂
Hi! Thank you for this detailed explanation about how to treat bumblefoot. We’ve had a couple chickens that are prone to it and we’re now pros at taking care of them. It can be quite the process, but consistency every 3 days has been key for us. Thanks again!
Hello
Thank you for the great article.
Can i ask for suggestions on how to wrap a cochin bantam chicken leg? I undestood and i think i can manage the operation and i am also persistent, but all the feathers?
Thank you
The feathers make it tricky! I would just be careful and make sure that the feathers are laying the right directions as you wrap.
I want to to thank you for this good read!! I certainly loved every little bit of it. I have you bookmarked to look at new things you postÖ
You’re welcome and I’m so glad that you found it helpful. Glad to have you here 🙂
Great information! I haven’t had this yet with my chickens, but it can always happen. I will be printing this out! Thanks!
Awww…I hope they are feeling better with the treatment. Chickens fascinate me. I’d love to have a few, but know it’s a huge responsibility.
I’ve never had bumblefoot in my flock in over 40 years of chicken keeping. I’ve often wondered about it though. Thanks for the great article. Now I feel prepared if I ever do need to treat it.
Wow! What’s your secret? Hopefully you’ll never have to deal with it 🙂
Great article!! I’ve got a duck that we have been keeping an eye on because she had a small cut on her ankle. Luckily, I’ve got all the above equipment due to the goats and boys. Just a tip that we have found that works fantastic. If you’re chicken doesn’t like to sit still, flip them on their back and let them relax. It’s almost like tonic immobility in sharks. They seem to go into a trance like state and you can do pretty much whatever to them, including setting a broken leg…. which we’ve done….twice.
Wow! That’s such a great tip. I’ll have to try that vs our towel burrito method next time. Thank you and good luck on your duck’s ankle 🙂
Great article! I have been reading and watching many videos. Still a bit nervous, have been using soak method with prid drawing salve as well as vetericyn spray and antibiotic ointment with NO painkillers added. The husband thought it was time, I am trying for non surgical method, the scab came off but there is much more infection to come to surface. So we rewrapped using same method, (betadine, vetericyn, neosporin no pain relif prid gauze wrap) again. Hoping this wasn’t a mistake? It is a bad case but she is moving better even now. Thank you for these articles! So helpful!
Oh my goodness, what an incredibly helpful article! Thank you for making such a helpful guide. I will definitely keep this article on hand. Fortunately this is not something we have had to deal with yet.
I’m glad you found this article helpful and hopefully you won’t actually need it!
While we don’t have chickens yet, this was one of those things I was super nervous about for when we DO have chickens. However, you’ve broken it down so well that I’m confident I could do this to help. 🙂
The process does seem intimidating (I was nervous my first time!), but it’s not too complicated once you have a few under your belt. I highly recommend watching some YouTube videos first.
It looks like removing a giant callus corn, well before it gets to the seriously infected stage. My friend wants to start keeping chickens, so this is an excellent resource for her. I’d love to have my own fresh eggs but with no garden and only a small roof terrace, I think is too small.
Thank you for passing this along to your friend and I hope you can have chickens someday! 🙂
When I was living in Jamaica 🇯🇲 and raised chickens, they most times developed a crusted patch on the bottom of their feet similarto the picturesin your post. Now I know what they are called. Thought they were naturally occuring from them grazing the yard. Had no idea bumble foot could be treated.
Yes, unfortunately, it’s a very common occurrence in free-ranging chickens. One of the (few) downsides, I suppose. I never have issues in the winter. Thankfully, it’s easy to fix as long as it is caught right away.