
Have you wondered what you’ll see when candling chicken eggs day by day? Baby chicks fully develop in just a short 21 days, which is so incredible and fun to watch!
With the art of candling, we’ll shine a light to monitor embryo development, identify potential issues and make adjustments throughout incubation so that you can have a successful hatch!
Day by day, we’ll witness the miraculous journey of a tiny heart beating, delicate blood vessels forming, and the rapid filling of the egg as we near hatch day. It’s an incredible process that reminds us of the delicate, yet remarkable resilience of life itself.
*Disclosure: This post may contain affiliate links to products (including Amazon). I’ll earn a small commission if you make a purchase through my link, at no additional cost to you! Regardless, I only link to products that I personally use on our homestead or believe in.
What is Egg Candling?
The process of egg candling involves holding up a light source to the egg to illuminate it. By doing so, you can take a look at what is developing (or not developing) inside.
This allows you to remove any non-developing eggs so that they don’t rot and explode in your incubator. Yuck!
Candling also gives you insight into how accurate you’ve been with your humidity settings, allowing you to make adjustments along the way. Plus, it’s just plain ol’ fun to watch your chicks develop!
How to Candle Eggs
Before we get into the day-by-day chick development, it’s important that we fully understand the candling process first.
Supplies Needed
Thankfully, the process of egg candling is pretty simple and you don’t need much!
#1 Egg Candler
Yes, you can try to use a regular flashlight, but you’ll be disappointed with the performance. Flashlights don’t provide a good seal around the egg. The light will remain scattered around the edges, making it hard to see what’s going on.
I highly recommend investing in a high-quality egg candler – you’ll be so thankful that you did! They are high-powered and snuggly fit the curved shape of the egg, providing perfect illumination. Below is the same one that I use and love!
The Homesteading RD's Product Picks This it the BEST egg candler on the market and is worth every penny! Take the guesswork out of incubating by using an egg candler, and have fun watching your chicks grow!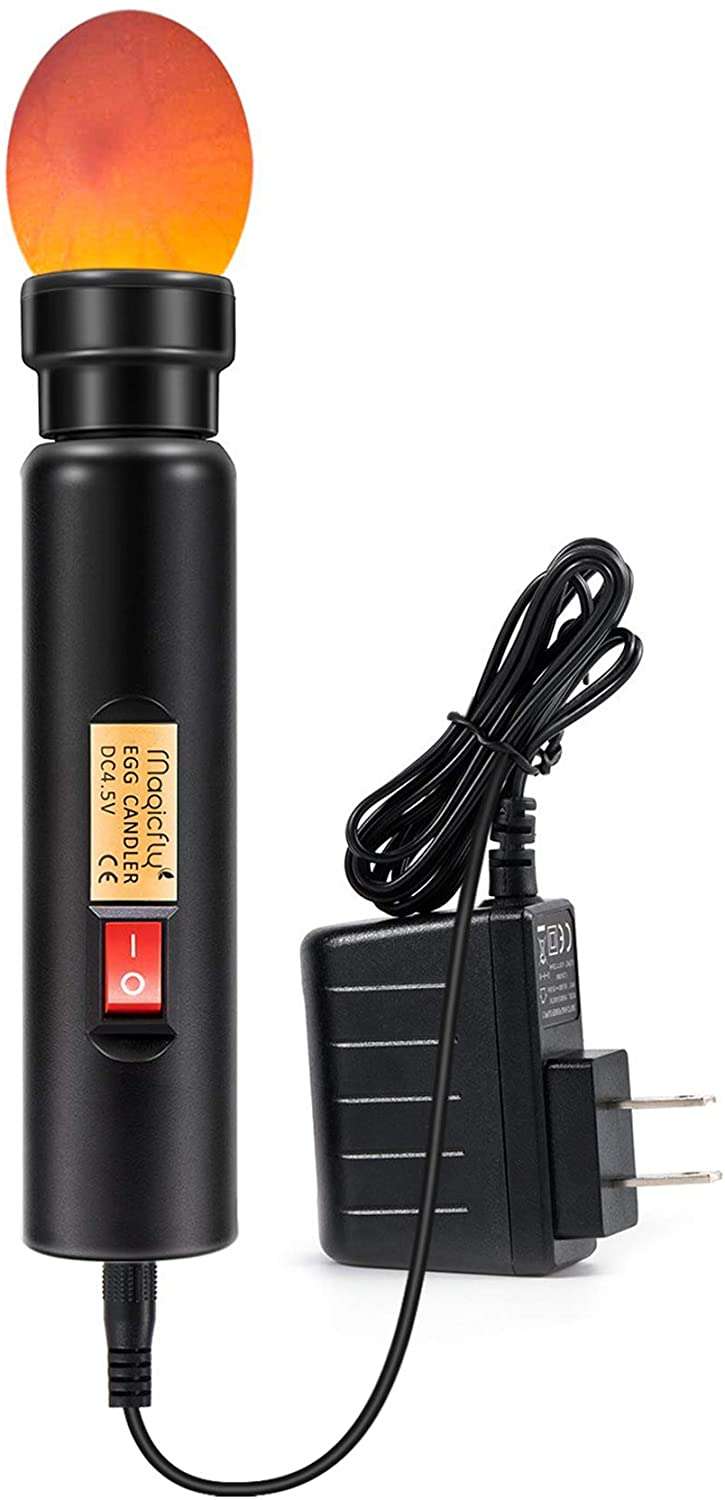
#2 Dark Room
You’ll be able to candle the eggs best in a completely dark room, so make sure to shut off all of the lights! If your room has windows, close the blinds or wait until after dark.
*TIP: I’ve found that even with the blinds pulled, there’s still too much light coming in through the edges. I always wait until bedtime to do my egg candling.
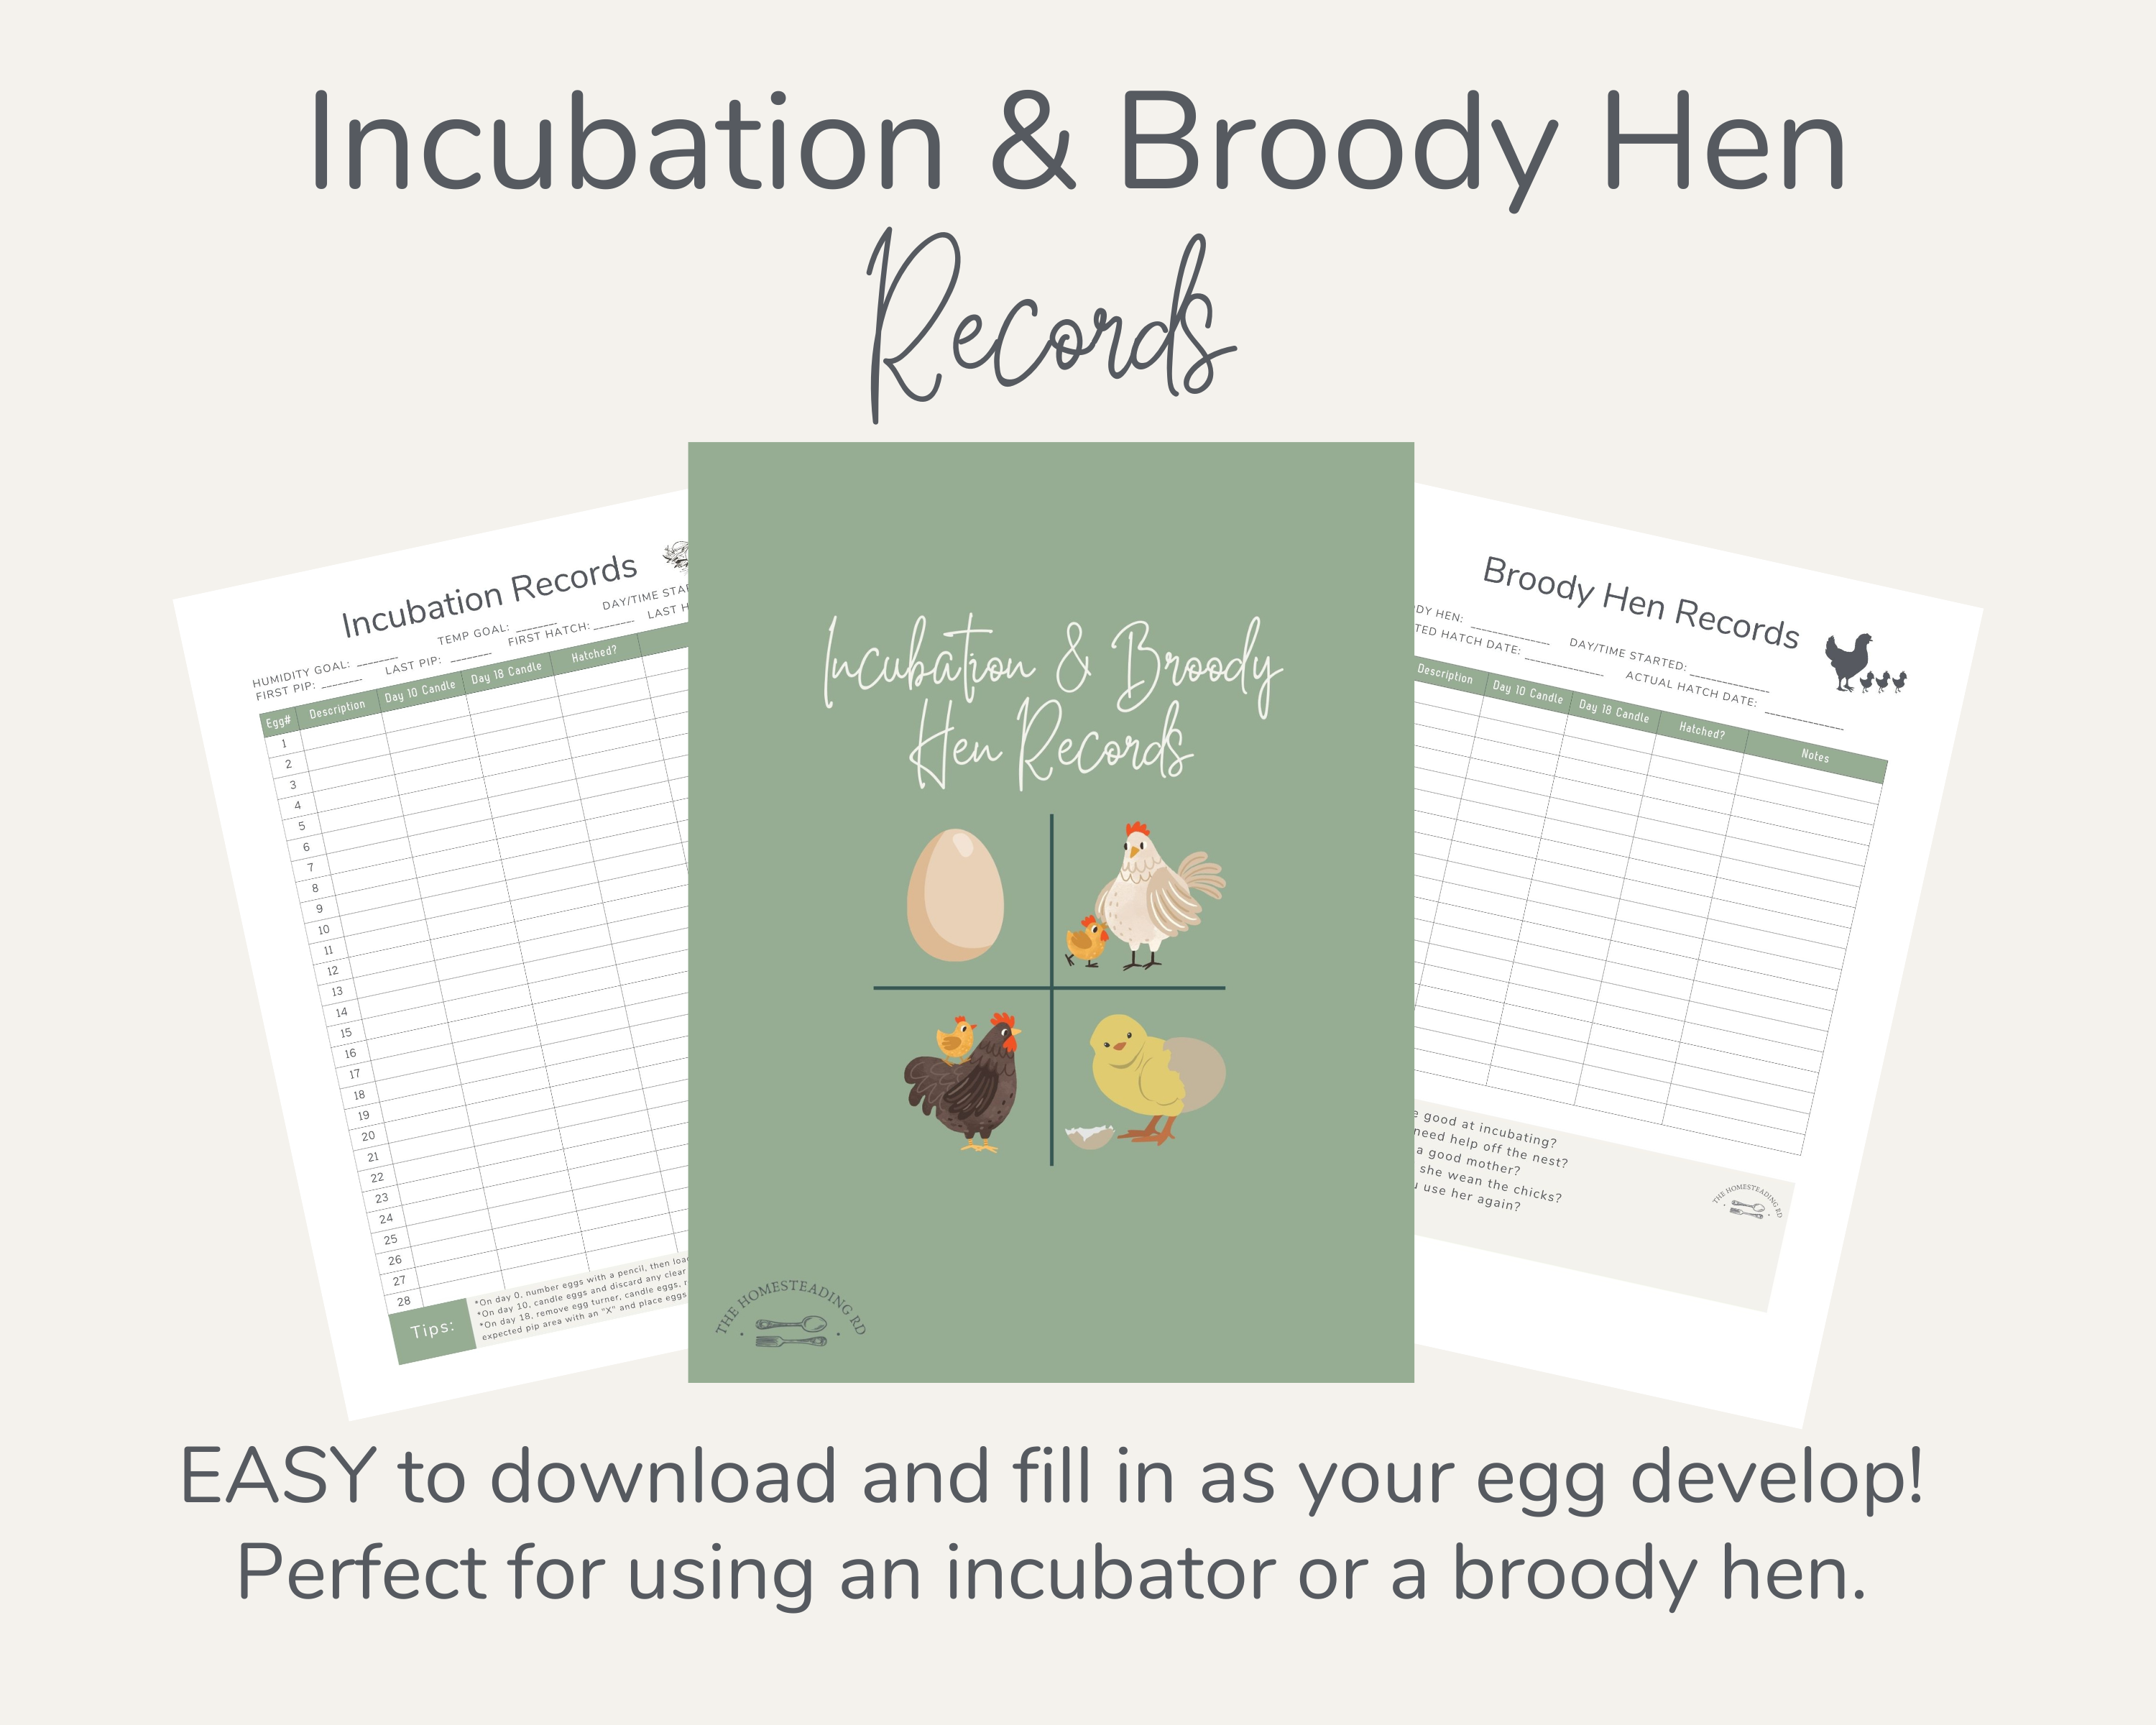
#3 Incubation Records
Lastly, you’ll want some way to record your findings and monitor chick development. This helps you not only keep track of each hatch, but it provides useful data to refer back to in future hatches to improve your hatch rate.
So, I’ve created an Incubation & Broody Hen Records sheet for this exact purpose! It’s so helpful! I use it for every single incubation that I do.
The Process
Step 1: Prep
Make sure you’re candling on the right day. Some people candle as frequently as days 7, 14, and 18. However, I’ve found that days 10 and 18 are the most useful and result in the best hatch.
*TIP: Never candle after day 18. Days 19-21 are when the chicks are positioning themselves for the hatch and shouldn’t be jostled. The lid should also not be removed since they need that precious humidity to rotate freely in the egg.
Start by washing your hands, then turn off the lights and plug in your egg candler.
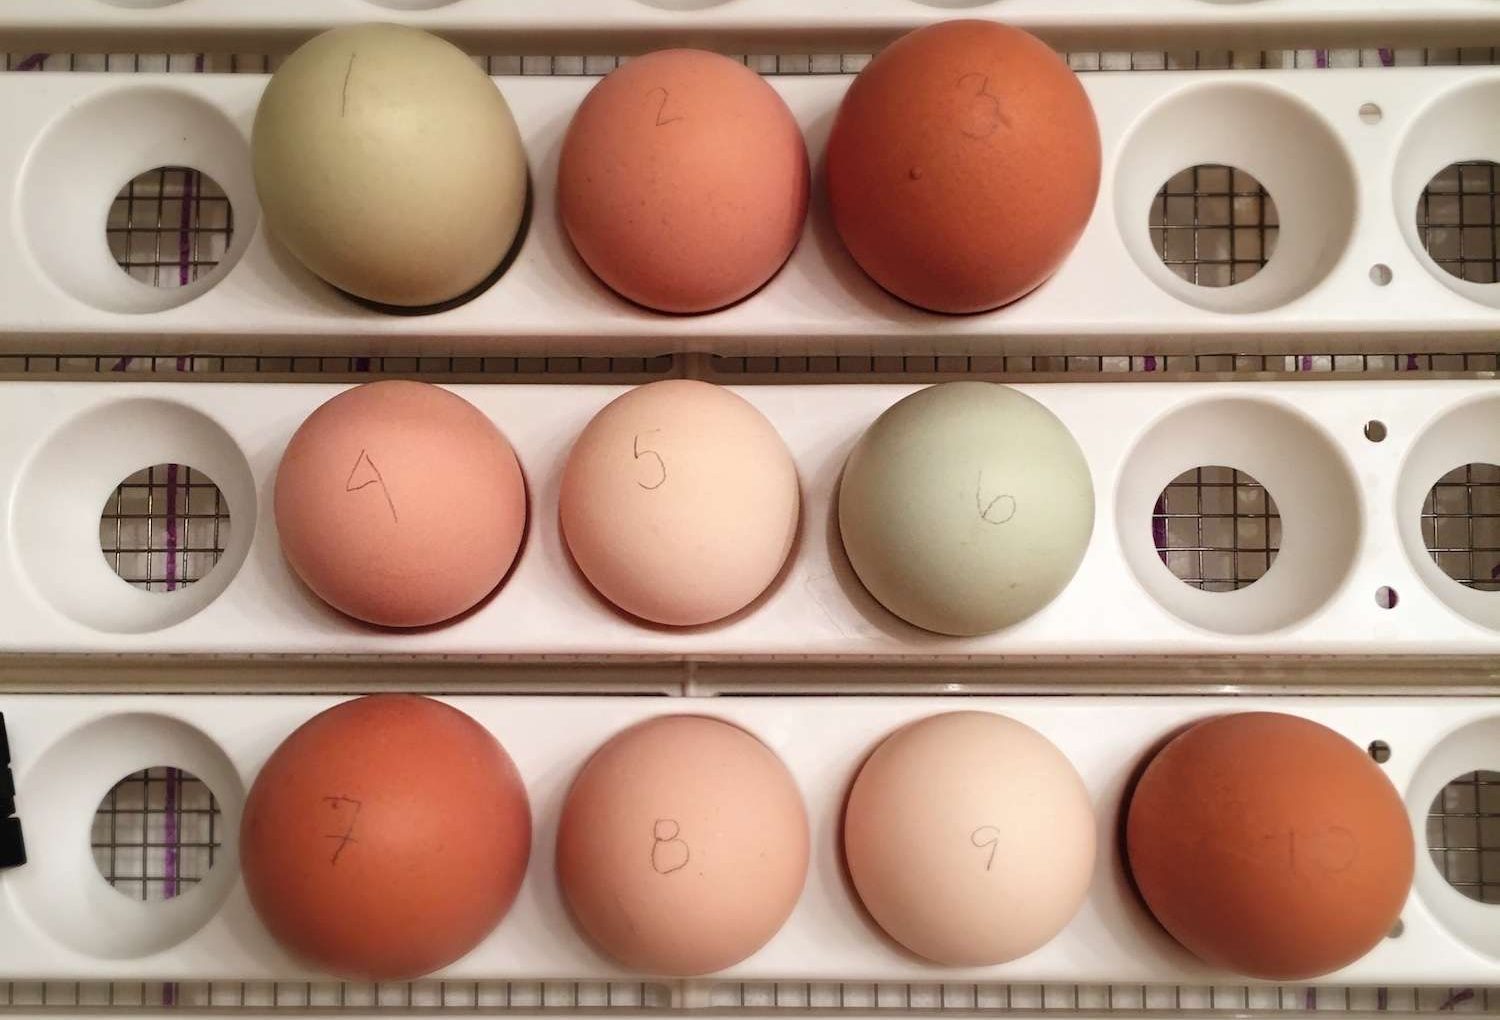
If you haven’t numbered your eggs yet with a pencil, do that now. That will help you identify which eggs correspond to the number on your Incubation & Broody Hen Records sheet.
Step 2: Candle
Carefully, remove your incubator lid and position the egg candler at the top of the egg (pointy end down), but at a slight angle. That will give you the best view into the egg. It might take a few tries to get a good seal on it.
The key is to avoid bumping or jostling the egg as much as possible, especially during the early days. Those delicate blood vessels are still developing, so we don’t want to disturb them or the embryo might not survive.
Thankfully, my favorite incubator features an egg turner with the eggs in a great position for candling. I simply just go down the line of eggs and don’t even have to remove them. Woo hoo!
If your incubator is set up where the eggs are laying on their side, you’ll likely need to reposition them to get a good look. Using an empty egg carton to place the eggs temporarily is a great choice!
*TIP: Try not to have the incubator lid off for longer than 10 minutes to avoid overchilling the eggs. If you have a lot of eggs, you may need to replace the lid and try again in an hour or two.
Step 3: Evaluate
Once you illuminate the egg with your candler, it’s time to put on our inspector cap and evaluate what’s going on inside.
What to look for when candling eggs
- Clear eggs (ones with zero development) – remove these
- Ring of blood (dead embryo) – remove these
- Murkey contents that jiggle or slosh about (dead embryo) – remove these
- A dark spot that is significantly smaller than the rest of the developing eggs (dead embryo) – remove these
- Blood veins (alive!) – put back in the incubator
- Movement (alive) – put back in the incubator
- Solid mass that doesn’t slosh (alive) – put back in the incubator
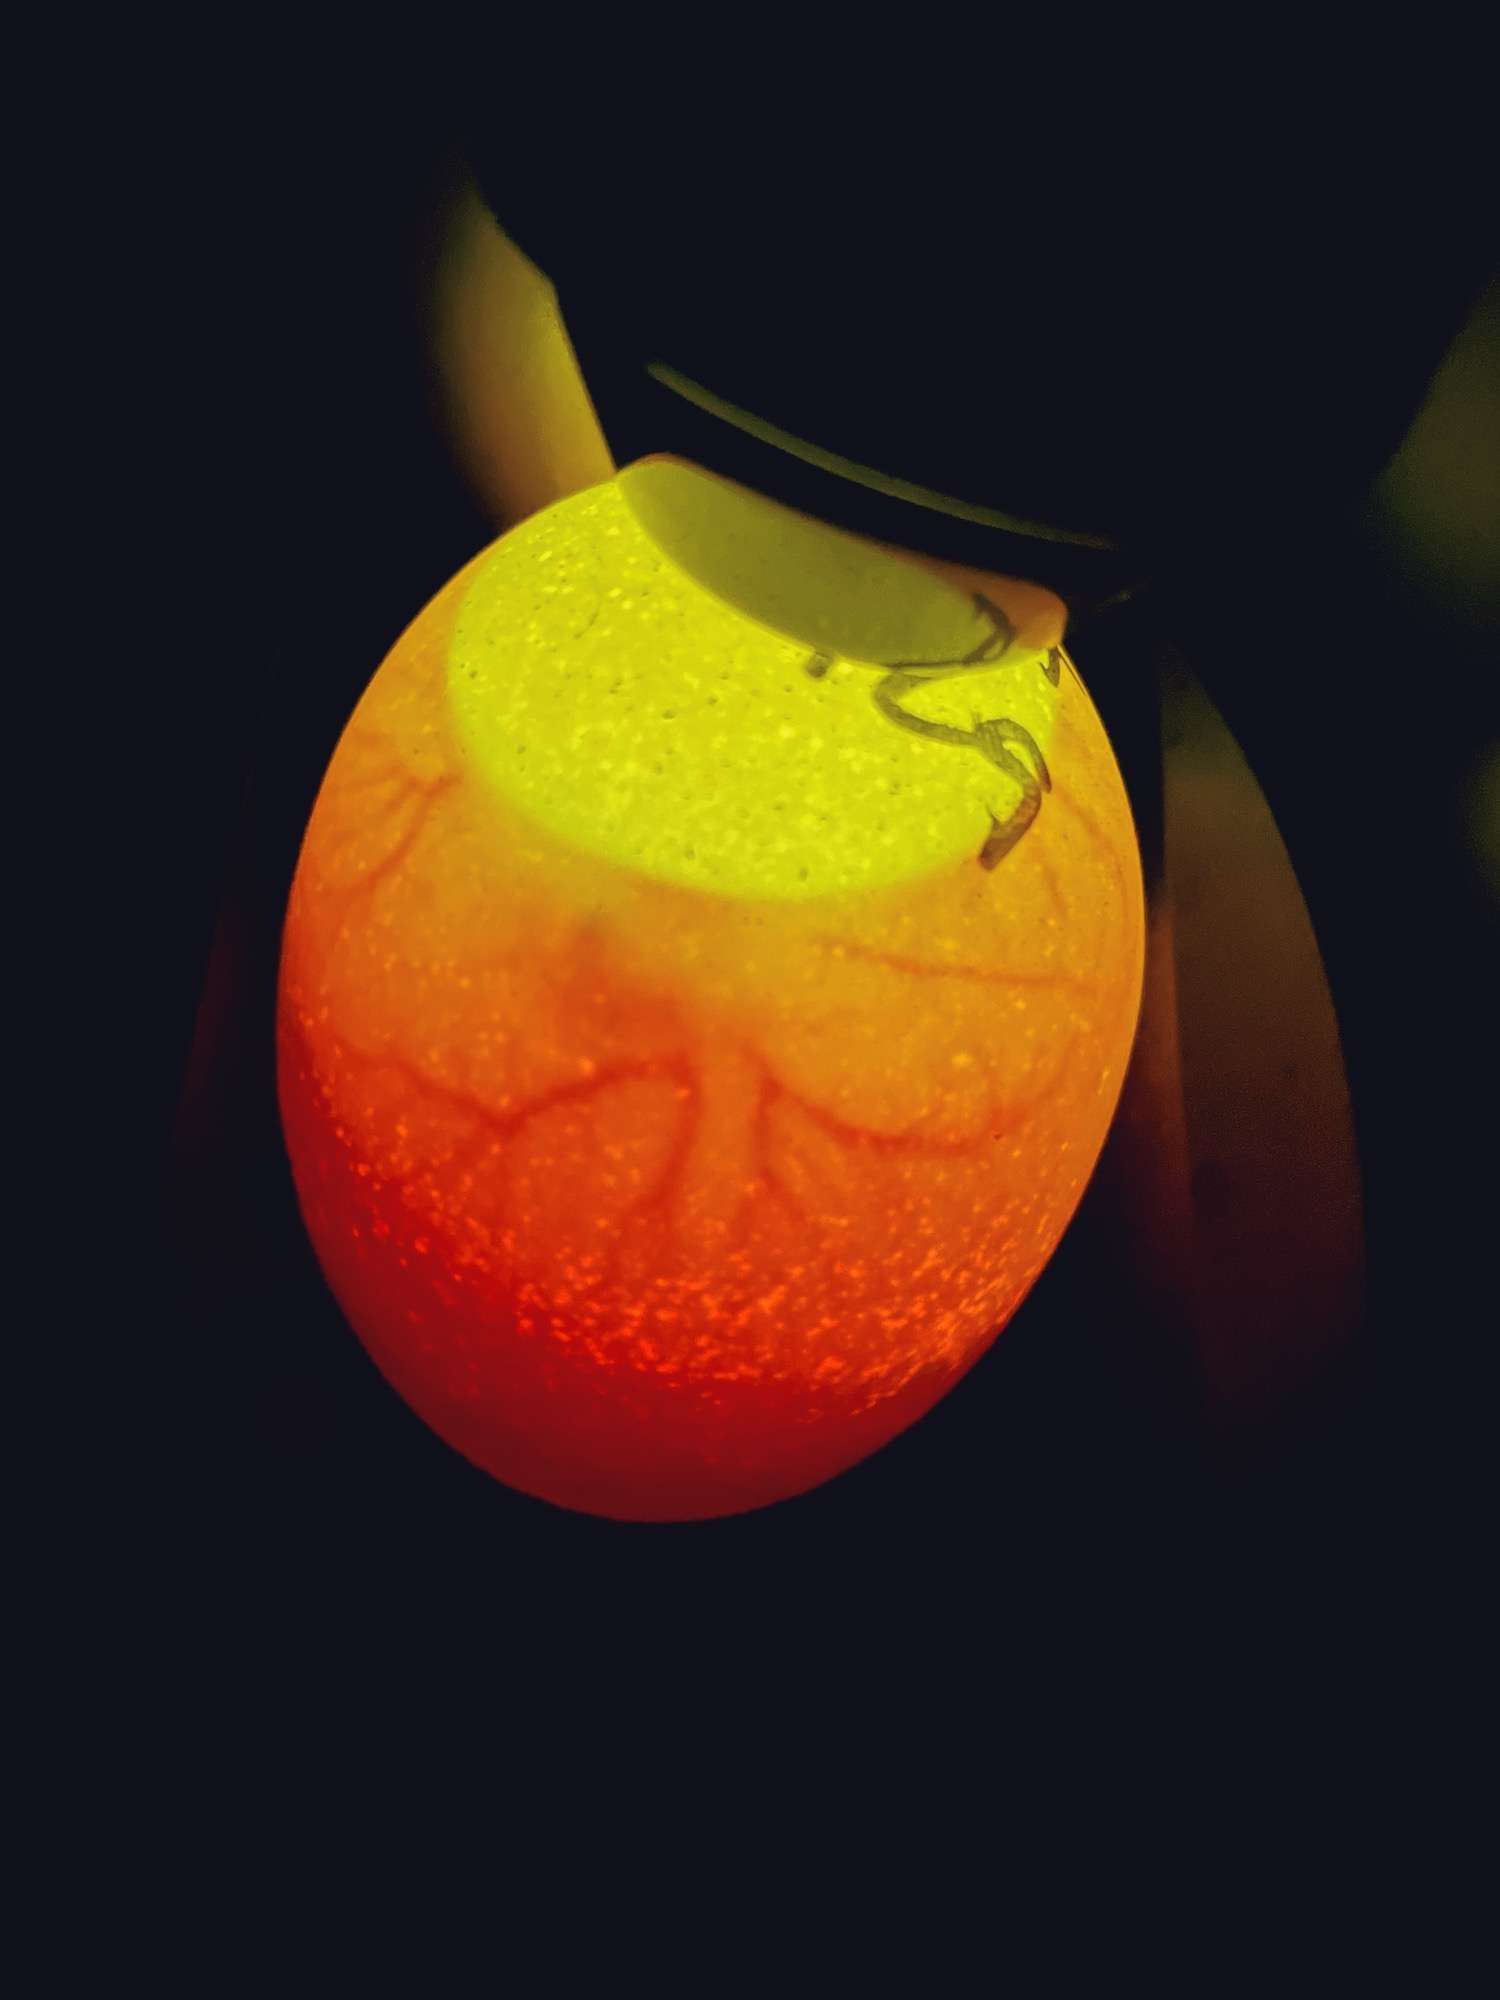
- Size of the air cell relative to how many days along the eggs are – adjust humidity levels based on this information. You might notice some variability between the eggs (thin and white-shelled eggs lose moisture faster than thick and dark-colored eggs), just make note of the average. See the photo below for what to look for.
- If the air cell is trending large, then increase humidity.
- If the air cell is trending small, then decrease humidity.
- Air cell abnormalities – sometimes the air cell can develop at the pointy end of the egg. If you notice this, then flip the egg so that it’s positioned air cell up in your egg turner.
![]()
*Want to see this in action? Take a look at my Instagram reel!
Once you’ve identified the status of each egg, made note of what you found on your Incubation & Broody Hen Records sheet and remove any non-viable eggs. Then, it’s time to close up the incubator and give them a rest. Great job!
If you’re feeling extra curious, place each of the dud eggs that you removed from the incubator in their own ziplock bags and crack them open. I always learn a lot by taking a look inside to see if I can identify what went wrong.
Candling Chicken Eggs Day-By-Day
Now that we understand the process of candling, let’s dig into what’s actually happening in those eggs day by day!
*Please note that while I candled daily to obtain the photos for this blog post, I don’t recommend doing this routinely. Stick with day 10 and day 18 for the best hatching results.
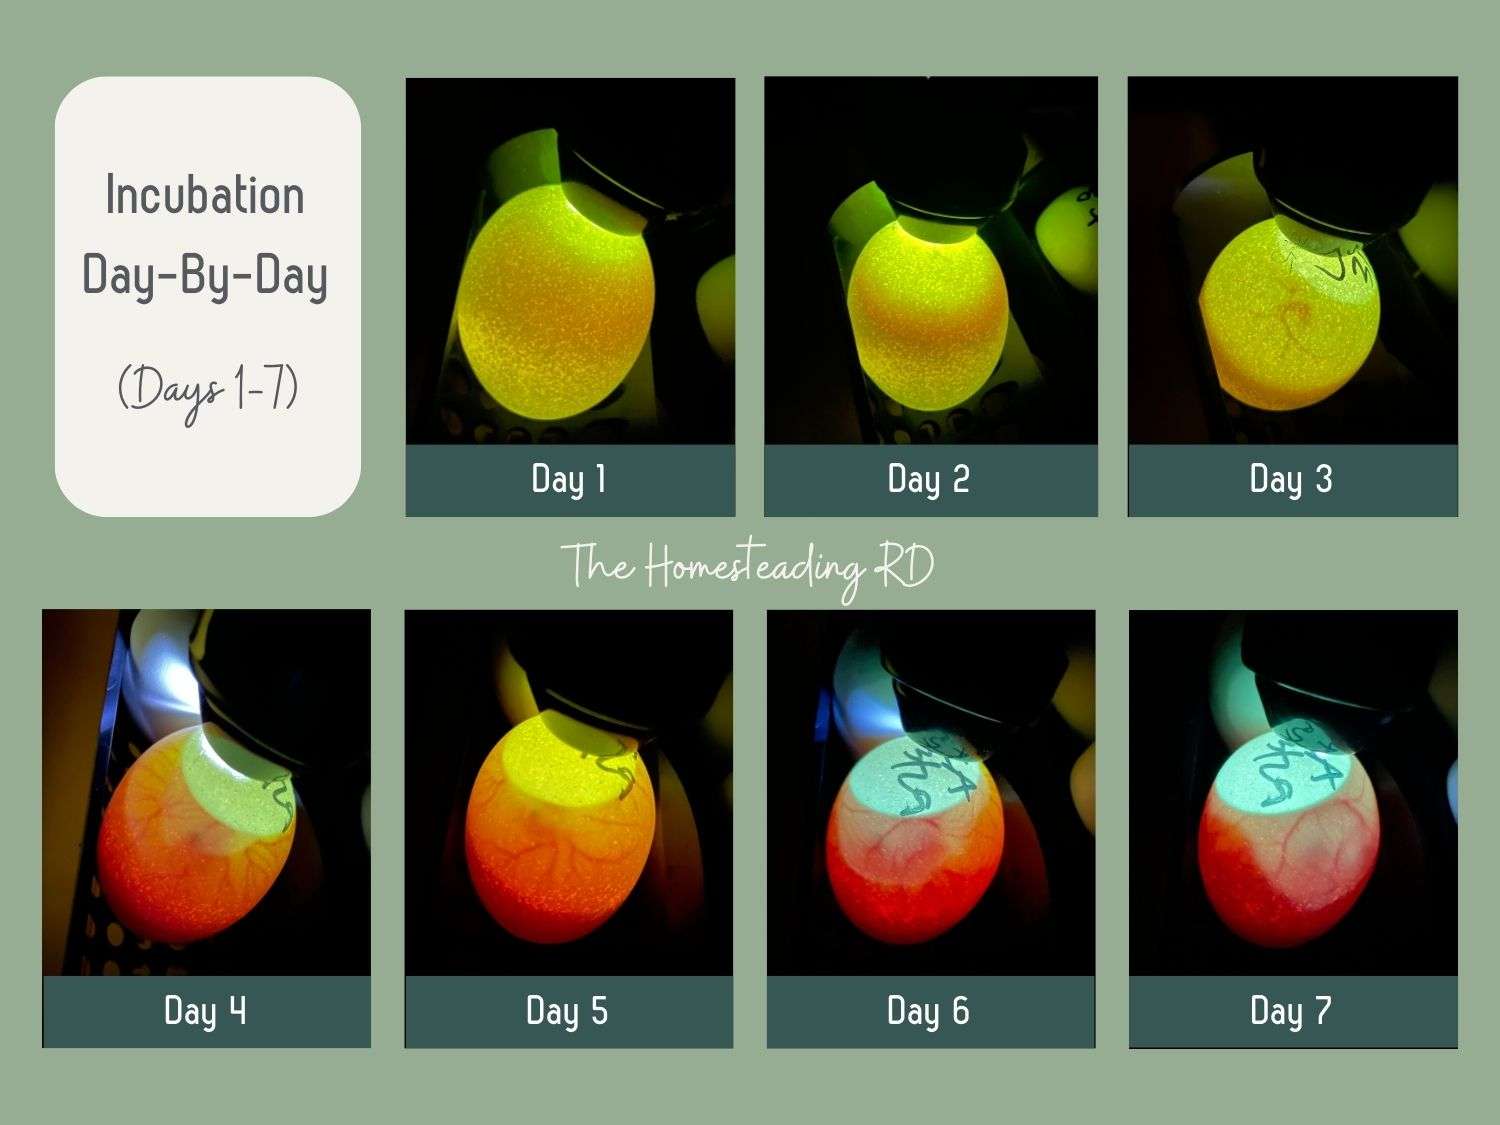
Days 1-7
A lot happens in the first 7 days, as you can see! We go from a clear egg to a visible embryo in just 3 days. The embryo continues to rapidly grow in size along with a strong network of blood vessels that spread throughout the egg. If you notice a black speck, that’s the chick’s eye!
These are delicate days and it’s common to lose a few eggs at this stage. That’s also why I prefer to NOT candle during this first week. The web of blood vessels is very delicate and any jostling can disrupt them.
The air cell is also starting to isolate itself from the other contents of the egg and becomes quite prominent. The air cell will continue to grow as the egg loses moisture. When the chick is preparing to hatch (day 19-20), it will pip into this air cell to start breathing.
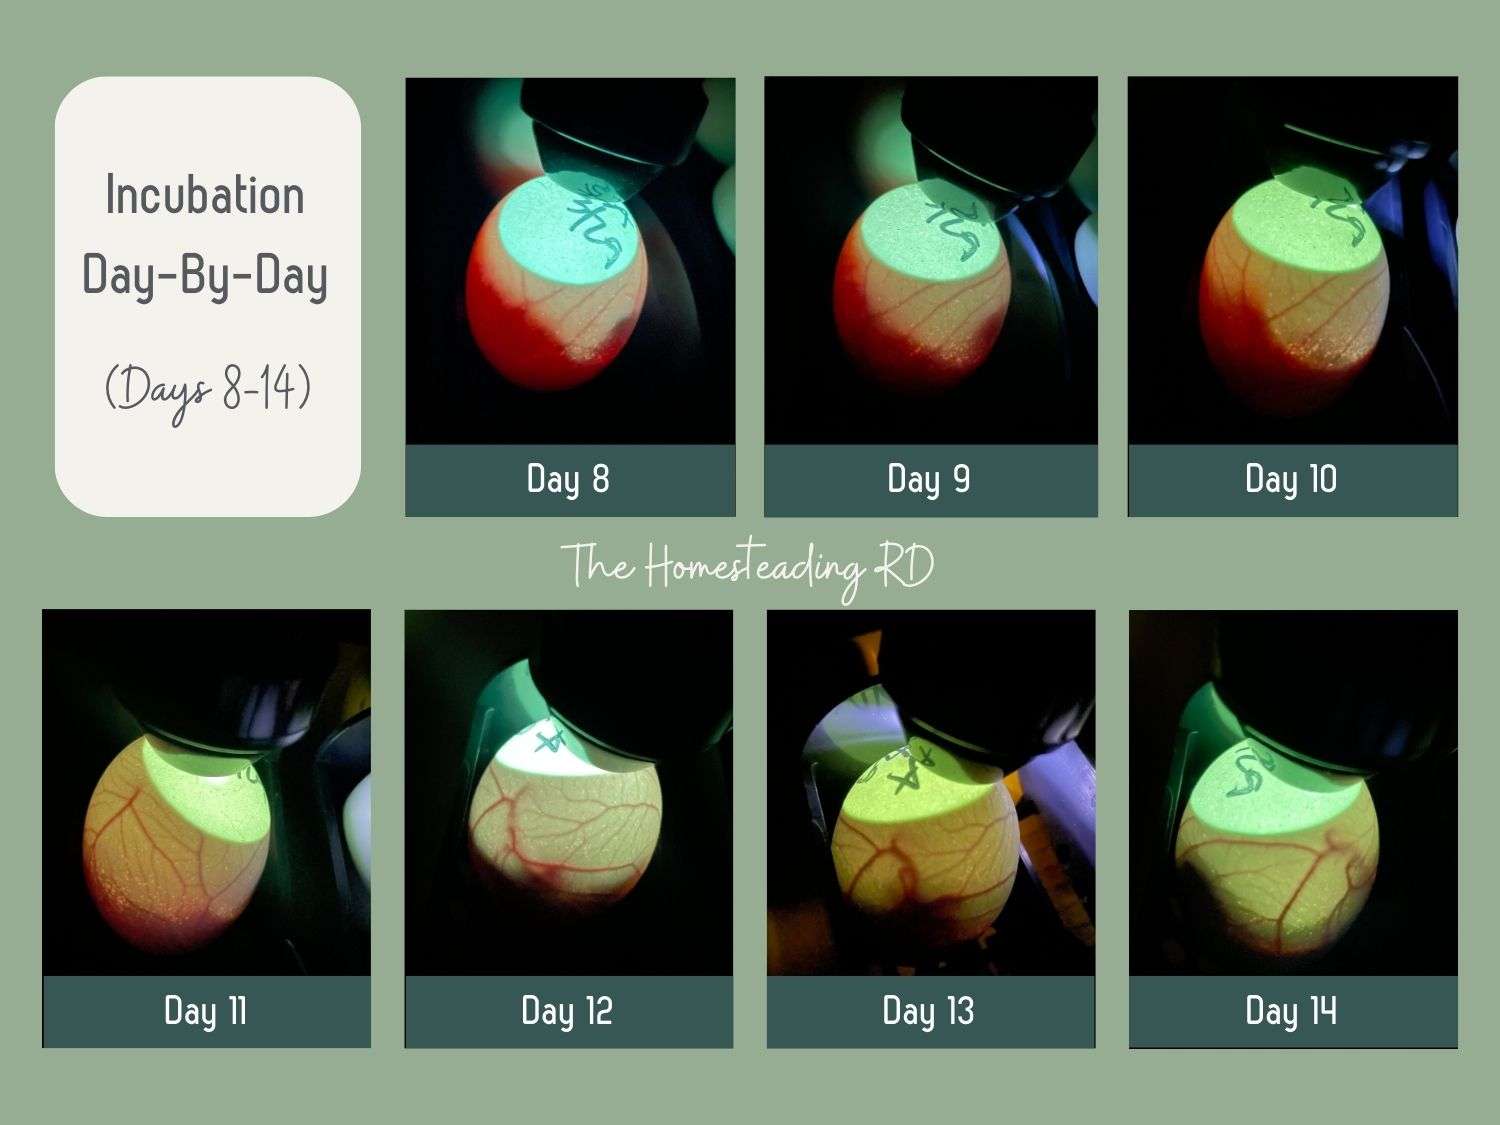
Days 8-14
We’ve made it to the mid-way point of incubation – woo hoo! At this phase, it’s all about growth. The chick is growing, the veins are becoming more prominent and the air cell is increasing in size. The chick is starting to grow feathers now and you should see quite a bit of movement!
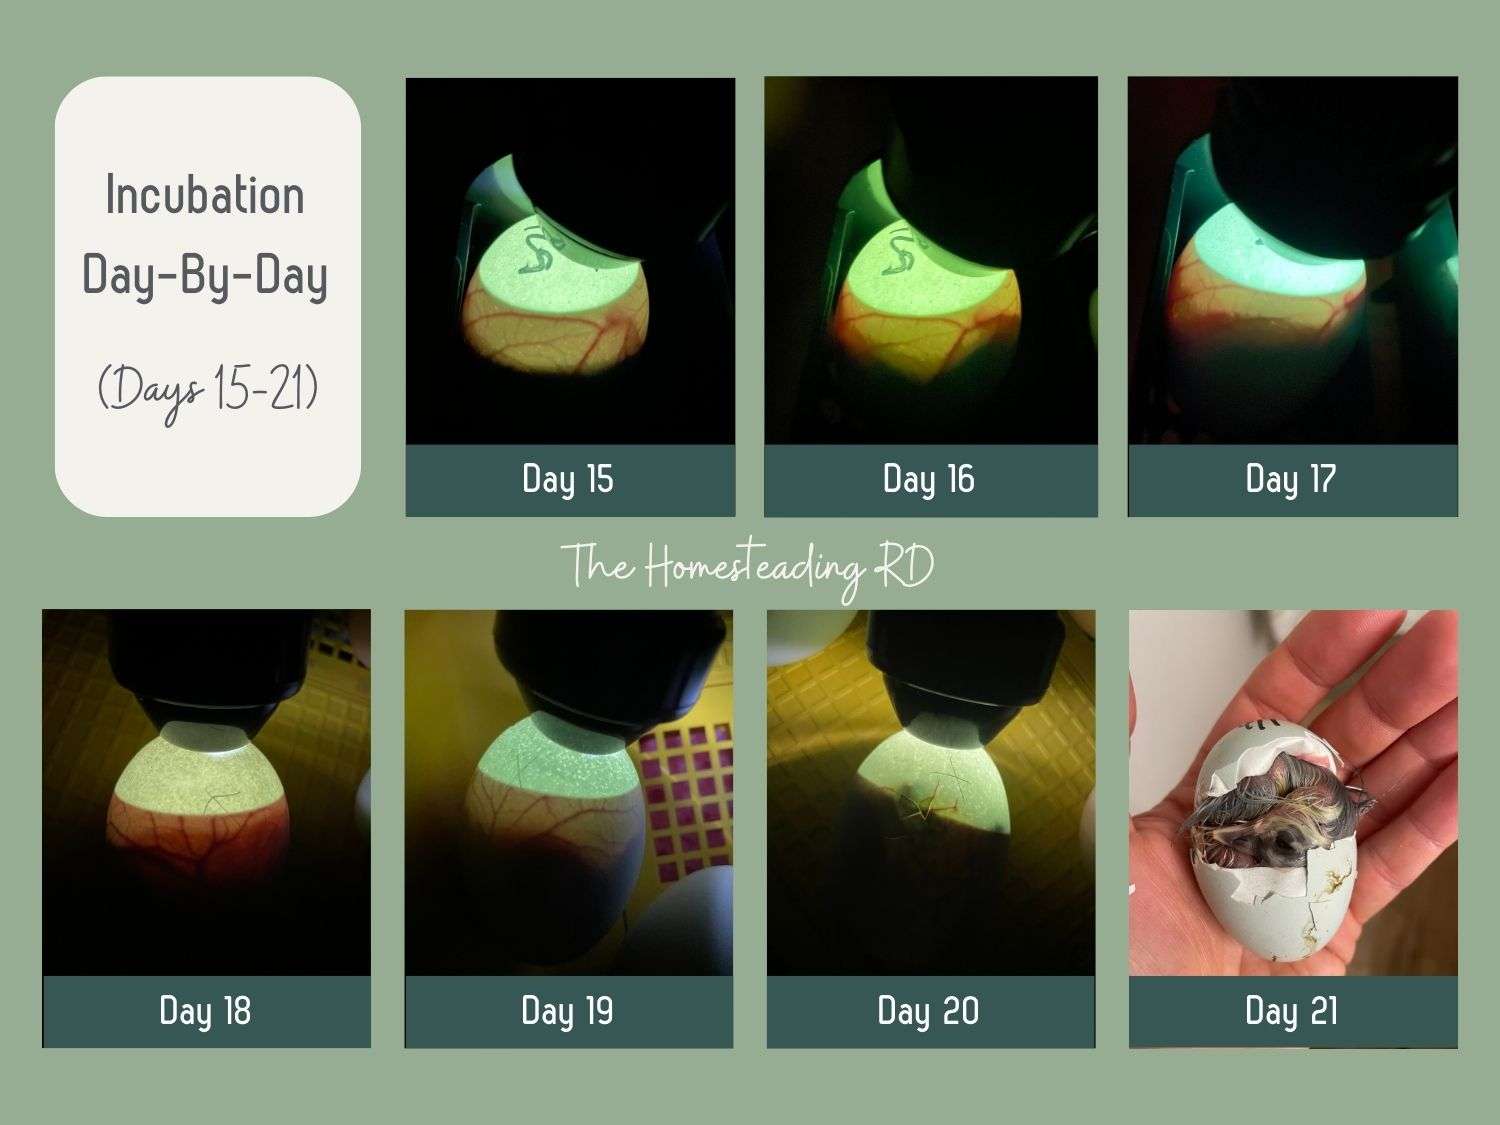
Days 15-21
Now, the chick is really starting to fill up the egg! The egg is getting darker and darker and you may not notice as much movement because the chick is running out of room to move. It’s also rapidly absorbing the rest of the yolk for that essential nutrition to power the exhausting hatch.
Day 18 is “lockdown“, where we stop turning the eggs and increase the incubator humidity to 65%. This allows the chicks to position themselves properly for the hatch and the added humidity ensures that they can rotate freely.
The chick will curve its head up underneath its wing with its beak pointed toward the air cell. On days 19-20, it will pip into the air cell and take its first breath. You’ll probably hear some peeps from the incubator!
You can see the chick’s beak has broken through the air cell in my day 20 photo, which is called an “internal pip.” It has also proceeded to peck its first hole through the actual eggshell, which is called an “external pip.” It won’t be long now!
Troubleshooting for Candling Eggs
It’s incredibly rare to have a 100% hatch rate (55-65% is typical for beginners with improvement to 75-85% with experience), so it’s a good idea to be prepared for what issues you might encounter throughout the incubation period.
Also, don’t miss my extensive incubating article Hatching Chicken Eggs: The Ultimate Beginner’s Guide!
Clear eggs
Clear eggs are simply unfertilized eggs, or eggs that weren’t viable for development (too old, chilled, nutrient deficiencies in the breeder flock, disease, etc.). If you notice this, remove the egg from the incubator and discard it.
Blood rings
Blood rings occur when an embryo has died in the first 10 days or so. What happens is the blood vessels recede and collect in a ring shape around the inside of the egg. If you notice this, remove the egg from the incubator and discard it.
Death in days 1-7
This is the most common time to lose developing eggs. It can occur due to unhealthy, diseased, or nutrient-deficient breeding stock, dirty eggs, improper storage of eggs before incubation, temperatures too high or too low, insufficient air circulation, or egg turning.
Death in days 12-18
It’s less common to experience deaths in these later days, but they can still occur. Common reasons include nutrient-deficient breeder stock, dirty eggs, temperatures too high or too low, or insufficient air circulation.
Deaths in days 18-21 (fail to hatch)
This is the second most common time to lose developing eggs, and the most devastating. You think your eggs are developing well, only to tap out in the final days. This is where humidity comes to play a big role. Too low and the chick will get shrink-wrapped and can’t move, too high and the chick will drown in the excess moisture.
Dark colored eggs
Once you start to delve into the world of beautiful black copper maran and olive egger eggs, you’ll notice that candling becomes incredibly difficult. Often, I cannot see any embryo or blood vein development, even with my high-powered candler.
If that’s the case, do your best to angle the light just right in a completely dark room. Sometimes, you just have to wait it out and see if they hatch!
It’s also a good idea to give them a sniff and if you notice any rotten egg smell, remove it immediately. You don’t want a rotten egg exploding in your incubator!
Air cell is on the wrong side of the egg
Sometimes there can be an error and the air cell develops at the pointy end of the egg. If you notice this, then flip the egg so that it’s positioned air cell up in your egg turner. There’s a good chance it won’t hatch, but there’s also a small chance it might! I’ve had it work out successfully, so don’t throw it out!
Other Chicken Articles You’ll Love:
- Hatching Chicken Eggs: The Ultimate Beginner’s Guide
- The 8 Best Egg Incubators
- Brooding in Poultry – Everything You Need to Know!
- Fairy Eggs: My Chicken Laid What!?
Final Thoughts
The practice of candling chicken eggs day by day offers a wealth of valuable insights into the intricate process of embryo development. From the initial formation of the embryo to the development of vital structures and organ systems, candling provides a window into the mesmerizing journey of life unfolding within those delicate shells.
Are you a first-time chicken keeper? Or maybe you don’t even have chickens yet? Definitely check out my ultimate resource How to Care for Chickens: A Beginners Guide.
*Information in this article was referenced from personal experience and/or from my favorite chicken book Storey’s Guide to Raising Chickens unless otherwise noted.
The Homesteading RD's Product Picks: | |
| This is THE chicken book to have! I've had my copy since the beginning and it's the one that I keep going back to time after time. It provides everything you need to know from coop design, hatching chicks, layer nutrition, and much more! |


ty so much for your time and the awesome pics. Helped me so much! TY!!!
You’re so welcome! Happy hatching 🙂
Geeat great post – well done – Really appreciate good info online
Thank you! I’m glad it was helpful
I just candled 4 of my 12 eggs. The incubator says day 6, but they look closer to day 5 development. The first day with the incubator I had issue getting the humidity and temperature set properly, so this makes sense. I’m so glad I found your chart so I have a better idea of when to expect them to hatch. I’m so excited to hear their little chirps. This is my first time hatching eggs or raising chickens. Any tips on getting my dogs use to the birds or vice versa?
I’m so glad my article has been helpful for you! Gradual introductions are best!
Your explanation was great! Thank you
Glad to hear it! You’re welcome 🙂
Your post is the most informative I’ve seen on candling and what to expect at different stages of incubation. I so appreciate the whys behind your methods and the progression photos.
I’m so glad it was helpful!!!