
Chicken coop winterizing is an essential step if you live in a cold climate like me. It can easily hit -35F here in Minnesota, so we’ve had to perfect our methods and I can’t wait to share my best tips (and mistakes!) with you.
There’s a lot of information floating around out there and it can be hard to know what to do. You’re probably asking yourself a few questions:
- Should I heat my coop?
- How do I keep the water from freezing?
- How much ventilation is good?
- Do I need to insulate?
- How do I keep the eggs from freezing while I’m at work?
If you’ve been pondering these things, this article is for YOU! Let’s dive into the 6 essential steps to chicken coop winterizing.
*Disclosure: This post may contain affiliate links to products (including Amazon). I’ll earn a small commission if you make a purchase through my link, at no additional cost to you! Regardless, I only link to products that I personally use on our homestead or believe in.
6 Steps to Chicken Coop Winterizing
Winterizing your chicken coop is pretty straightforward once you understand the main principles and have the key products that make chicken keeping a breeze in the winter! Let’s dive in!
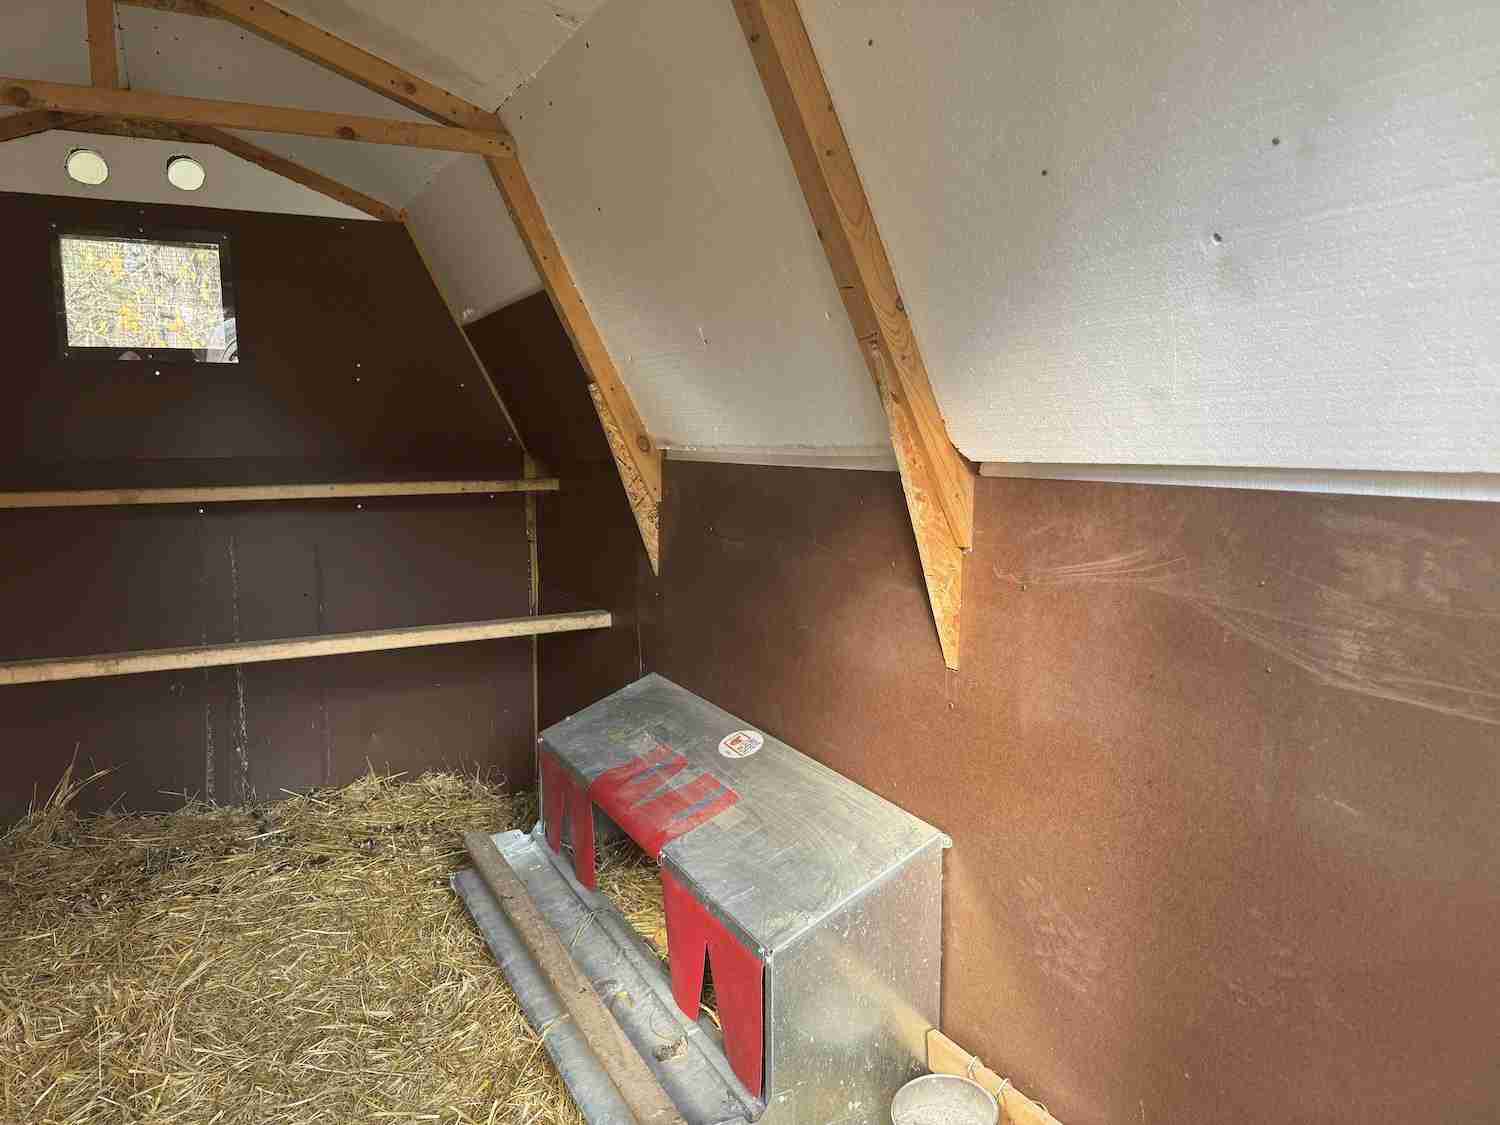
#1: Insulation
While simple walls and a ceiling are great in fair temps, they aren’t able to hold heat very well when it dips below zero. If you live in a cold climate like me, it’s essential to insulate the coop to keep that warm air inside. Having good quality bedding makes a difference, too!
Walls, floor & ceiling
There are many different insulation options out there and it all comes down to your budget and what you have available to you. When we built the poultry palace at our original 5-acre homestead, we used standard fiberglass batt insulation (which we later covered with plywood).
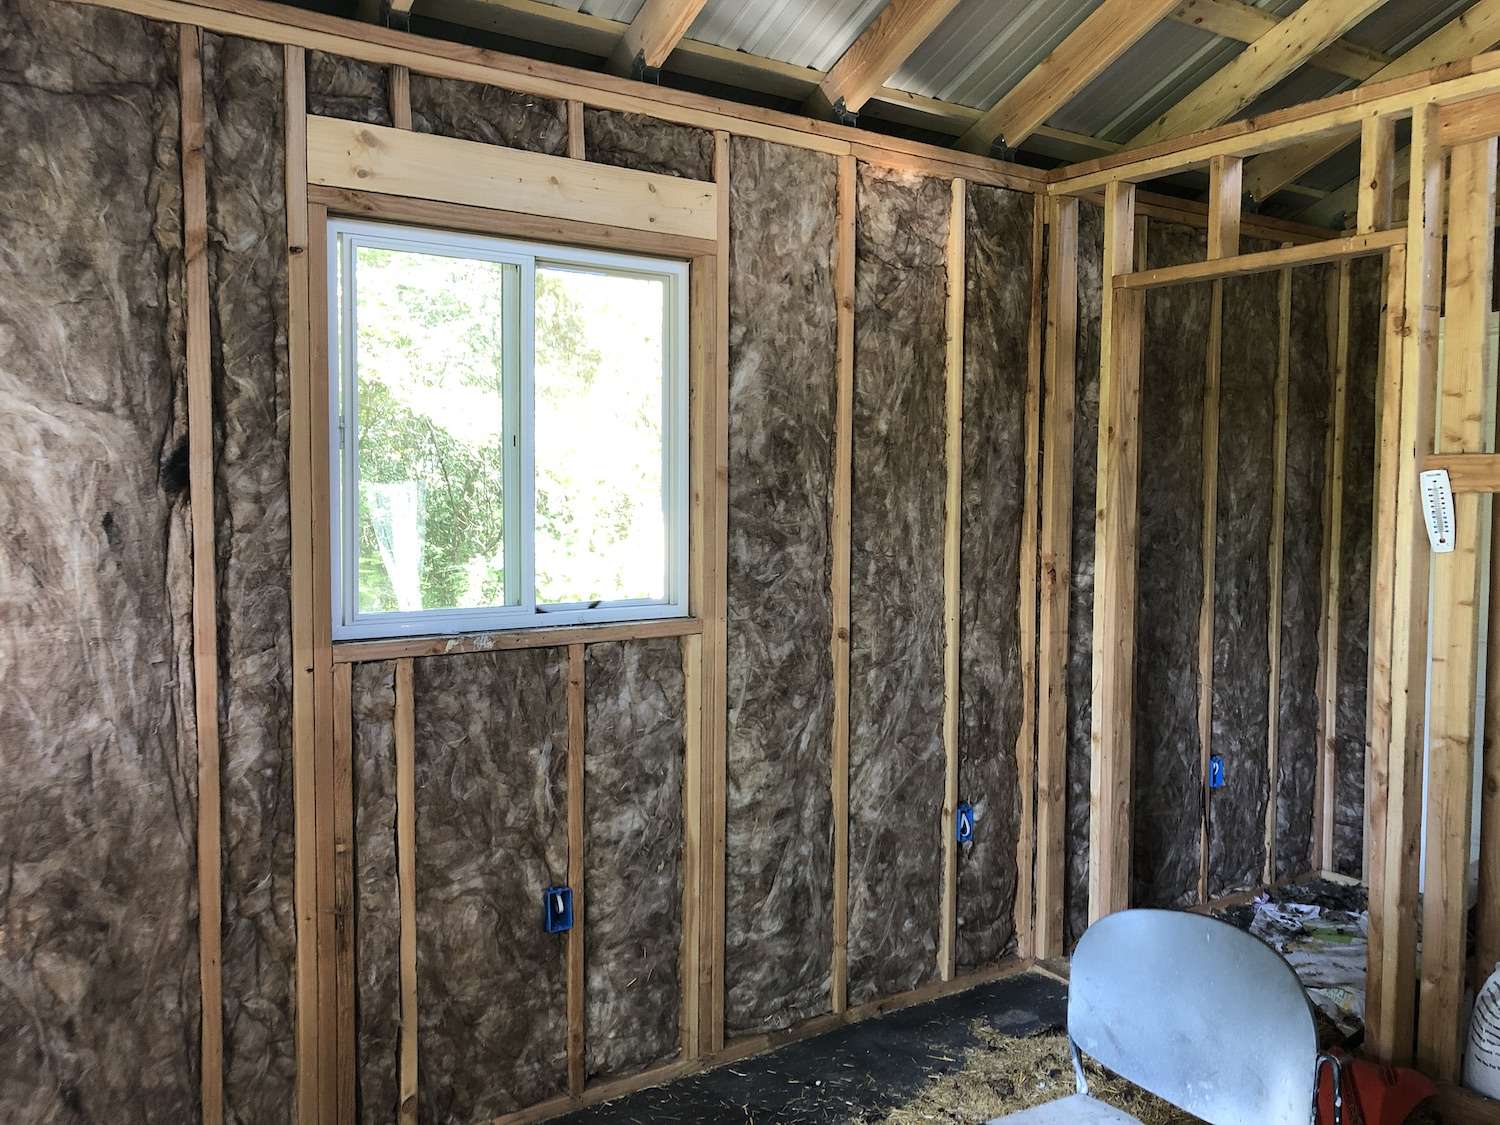
Now that we’ve moved to our new 240-acre homestead and are repurposing an old garden shed as a chicken coop (on a budget!), we went the simple route of 1 1/2″ styrofoam insulation.
The chickens will peck at it, though, so we’ve covered the lower sections with 1/8″ panel board. Watch me install this kind of insulation in my Winterizing the Chicken Coop YouTube video!
Bedding
Using the right kind of bedding is important to not only keep things cozy in the coop, but to control moisture levels as well. My top favorites are organic straw (sourced from a local farm if possible), pine shavings, hemp, and dried leaves.
Read more about each one in my article The 5 BEST Chicken Bedding Options!
Make sure to maintain a deep layer and stir it up a few times a week to keep it loose. Once it gets soiled, remove it promptly and replace it with fresh bedding to keep the moisture levels down.
Sand is a common bedding option, but I’m not a big fan – it doesn’t insulate well enough in cold climates!
#2: Airflow
A drafty coop and an airtight coop are both bad news when it comes to cold weather. Getting the perfect balance between the two is what you’re shooting for to keep your flock safe.
You know that feeling when you walk out on a cold day and the wind hits you? It can take your breath away. No good! On the other hand, an airtight coop (as cozy as that sounds!) is also trouble.
Moisture from their exhalations and poop needs to escape, otherwise, frostbite will be following close behind.
Windows
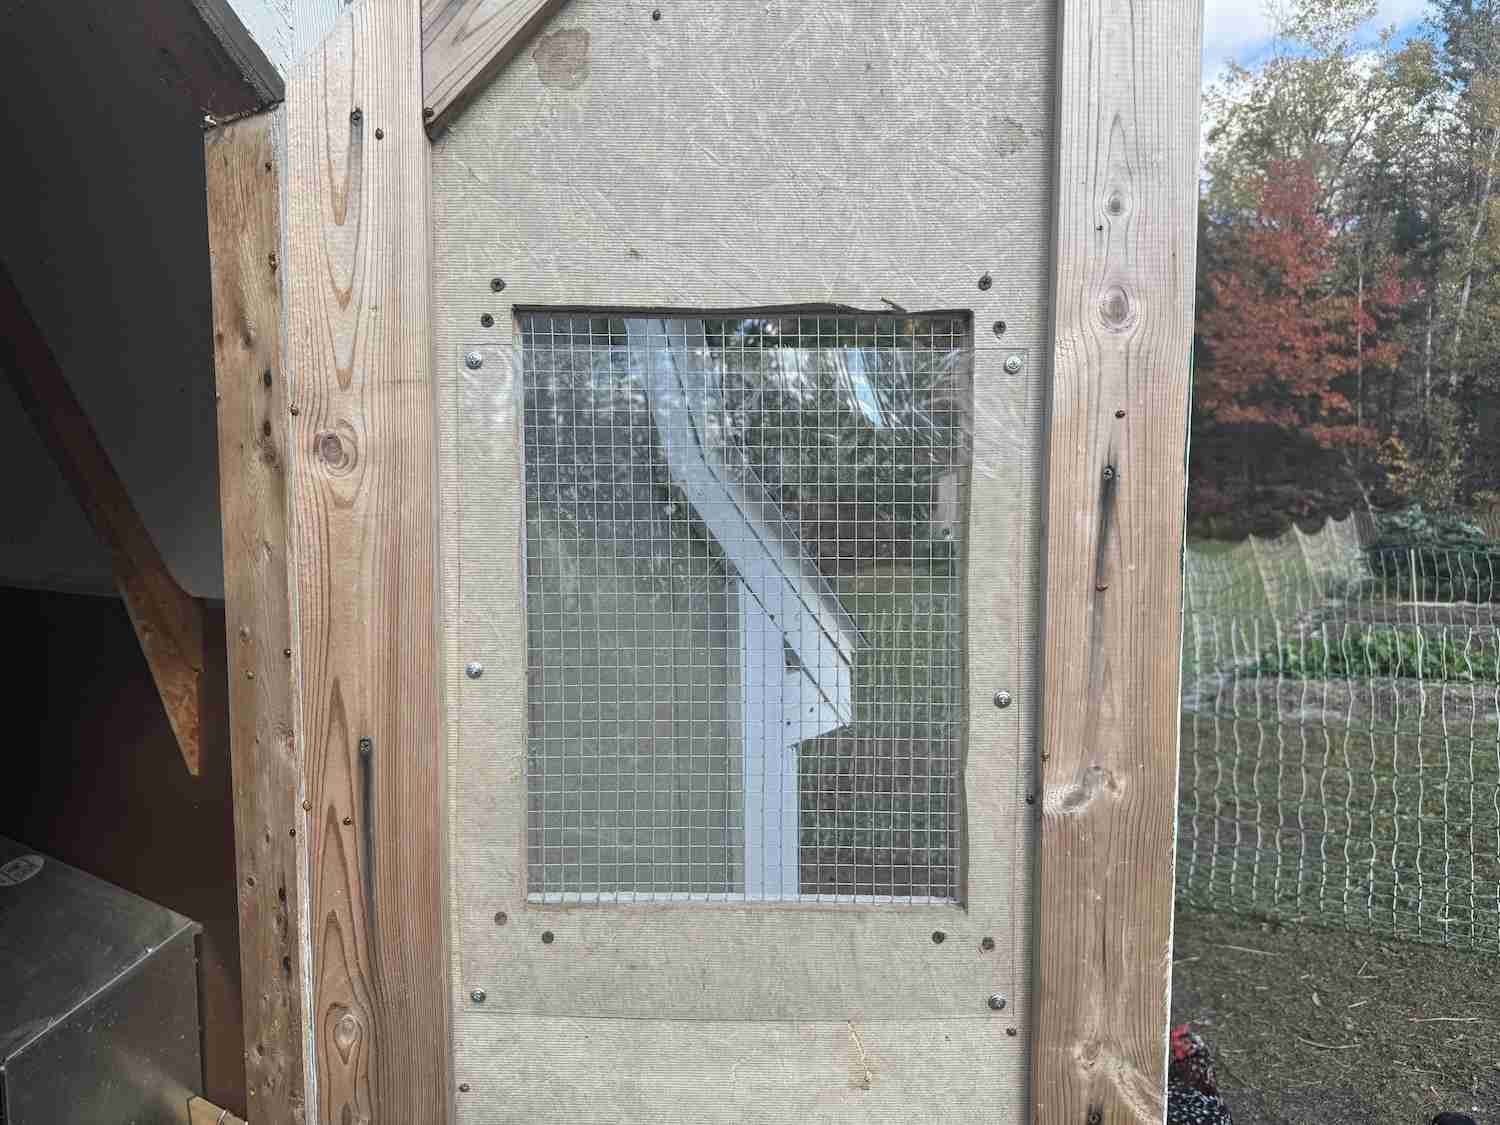
Windows are an excellent addition to a coop to provide natural sunlight and a cross breeze on those hot summer days. Once the weather starts to turn, however, you’ll need to winterize them.
What we like to do is cut out a temporary window using polycarbonate and secure them with sheet metal screws. This is an easy, inexpensive way to block that winter wind while also creating a warm greenhouse effect. When spring comes, simply pull them back off.
Watch me install these window coverings in my Winterizing the Chicken Coop YouTube video!
If you don’t have dedicated ventilation holes (more on this in the next section!), I recommend installing the polycarbonate slightly lower than the full window so there is a 1″ gap on the top to allow for ventilation.
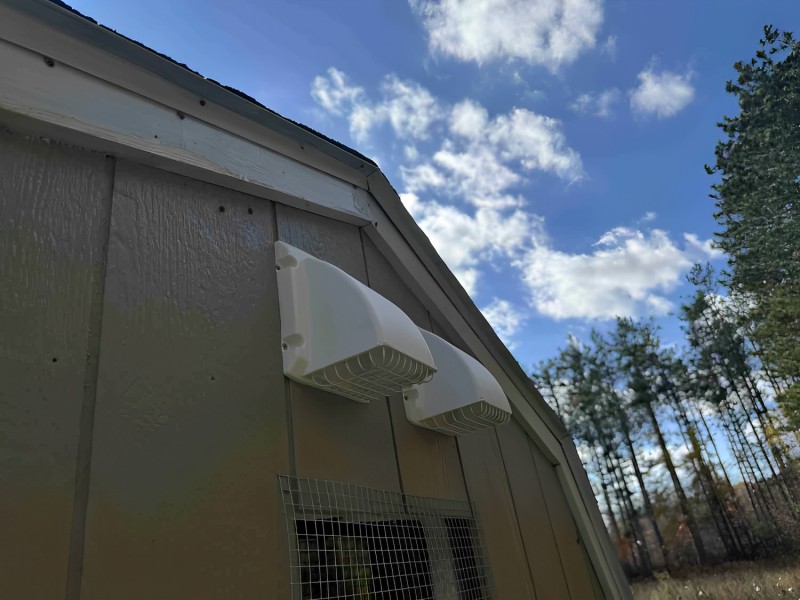
Ventilation
Proper ventilation is something that often gets missed by new chicken owners. It seems counterintuitive to have in cold weather, but having ventilation holes in your coop is essential to allow moisture to escape from the coop.
This can be achieved by leaving a 1″ gap at the top of the windows when you install the polycarbonate (as discussed above). Another method that I use is installing a couple 4″ exhaust vent covers. Make sure to install them near the roof line since heat (and moisture) rises!
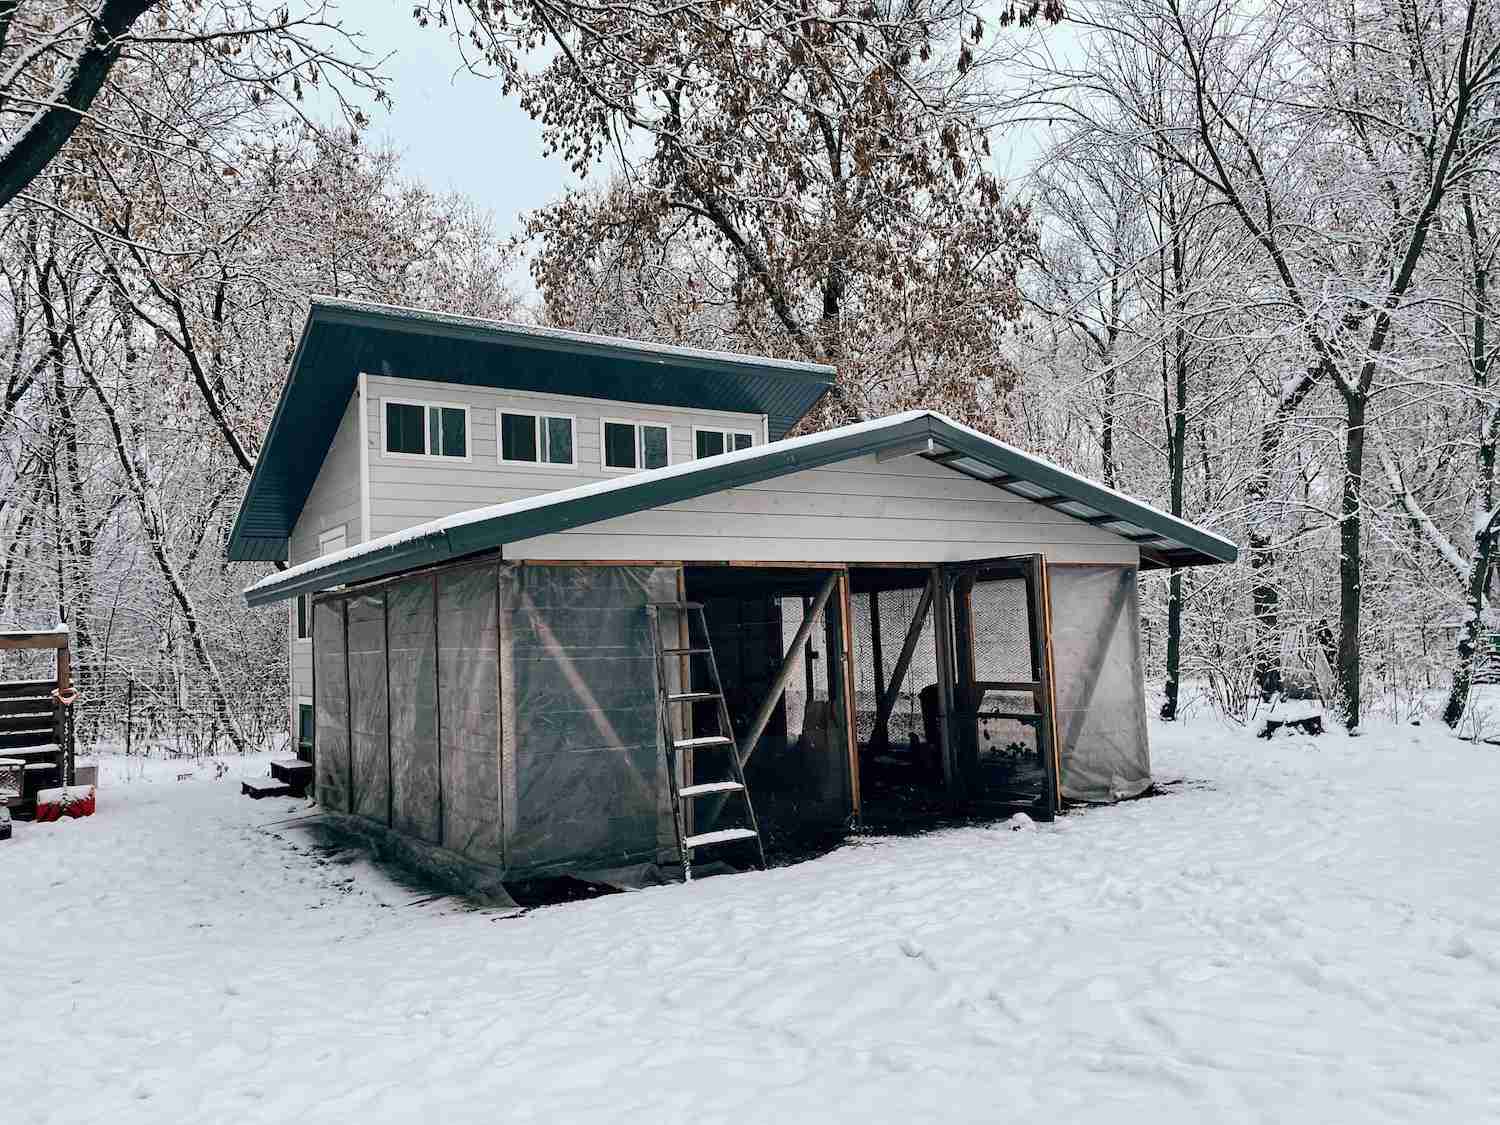
Wrap the run
Once I started to wrap the run with plastic, I noticed a dramatic improvement in my flock (and coop) during the winter. First, it provides a greenhouse effect and blocks the wind, so it’s warm and encourages the chickens to get out and about. It also keeps the snow out and the run dry, which makes for a clean run.
Another added benefit that I’ve discovered is that the corners of the run end up becoming excellent dust baths since the area stays warm and dry. I like to add ashes from our wood stove to their dust baths – they love it and it’s a great way to dispose of the ashes all winter long.
You can attach polyethylene plastic with a staple gun, but I prefer furring strips as it will help the plastic withstand those winter winds better. Simply cut to length and screw in place over the plastic. If the plastic is in good shape by spring, I roll it up and it can be reused the following season.
The Homesteading RD's Product Picks: | |
This is a great all-around choice for most homesteaders. -Light transmittance: 90% -Features: UV protection | |
This is another excellent options, especially for those wanting to avoid Amazon 🙂 -Lifespan: 4 years | |
TIP: Make sure that you are only covering the run with plastic, not the coop! You want the coop to be able to breathe and release moisture.
#3: Frozen water
Nothing is worse than having to haul out fresh water every few hours on those super frigid days. After many years of experimenting (and mostly failing), we discovered heated dog bowls!
Every morning, I bring out a gallon jug of water to top it off. No more hauling large waterers back and forth to the house – woo hoo! To keep it clean, I keep a brush out in the coop so I can scrub it and rinse it when needed.
The trick is to get the right brand. We started with whatever was sold at our feed store, however, they would short out after a month or two. After doing some further research, I discovered the K&H Heated Dog Bowl and it’s been amazing!
Depending on my flock size, I run 2-3 of these at a time.
The Homesteading RD's Product Picks: | |
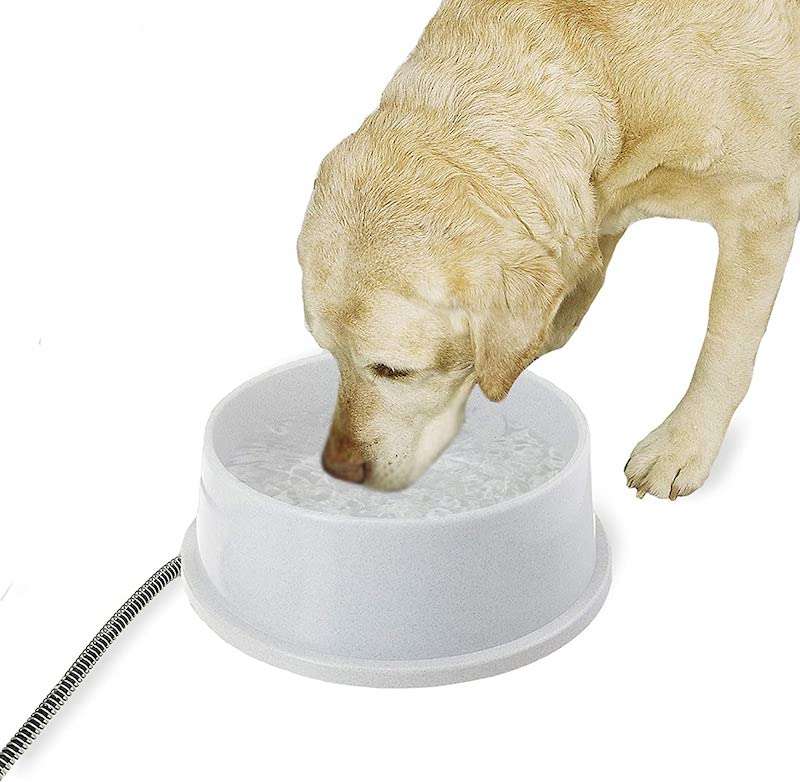
| This heated dog bowl is worth its weight in GOLD come winter time! This is the only solution that I've found to work well in our cold Minnesota winters. I run 3 of them for 40-50 chickens. |
Water placement
Once you have your heated dog bowl, WHERE you place it makes a huge difference as well. Moisture + cold = frostbite. The key is to keep the coop moisture level as low as possible in the winter, so always keep water outside in the run.
You may think you’re doing the chickens a favor by saving them a trip outside, but if the waterer leaks or gets knocked over… you’ve got a recipe for disaster. Plus, the more time they spend in the coop, the more moisture there is from them pooping and exhaling.
#4: Frozen eggs
One of the biggest winter challenges with raising chickens is frozen eggs. When it hits -30F, those eggs have no chance, especially if you’re at work and can’t head out to rescue the eggs every hour.
The problem with frozen eggs is that they are no longer safe for human consumption. When an egg freezes, it expands and causes the shell to crack. The egg contents are now exposed to potential pathogens in the environment. Such a bummer!
Once I discovered heated seedling mats, this was a game changer! They are inexpensive, safe to use, and have no settings to fuss with. Just plug it in, lay it in the bottom of your nesting box, and forget it!
A bonus is that the hens love how cozy and warm it is in the laying box – this will encourage laying!
The Homesteading RD's Product Picks | |
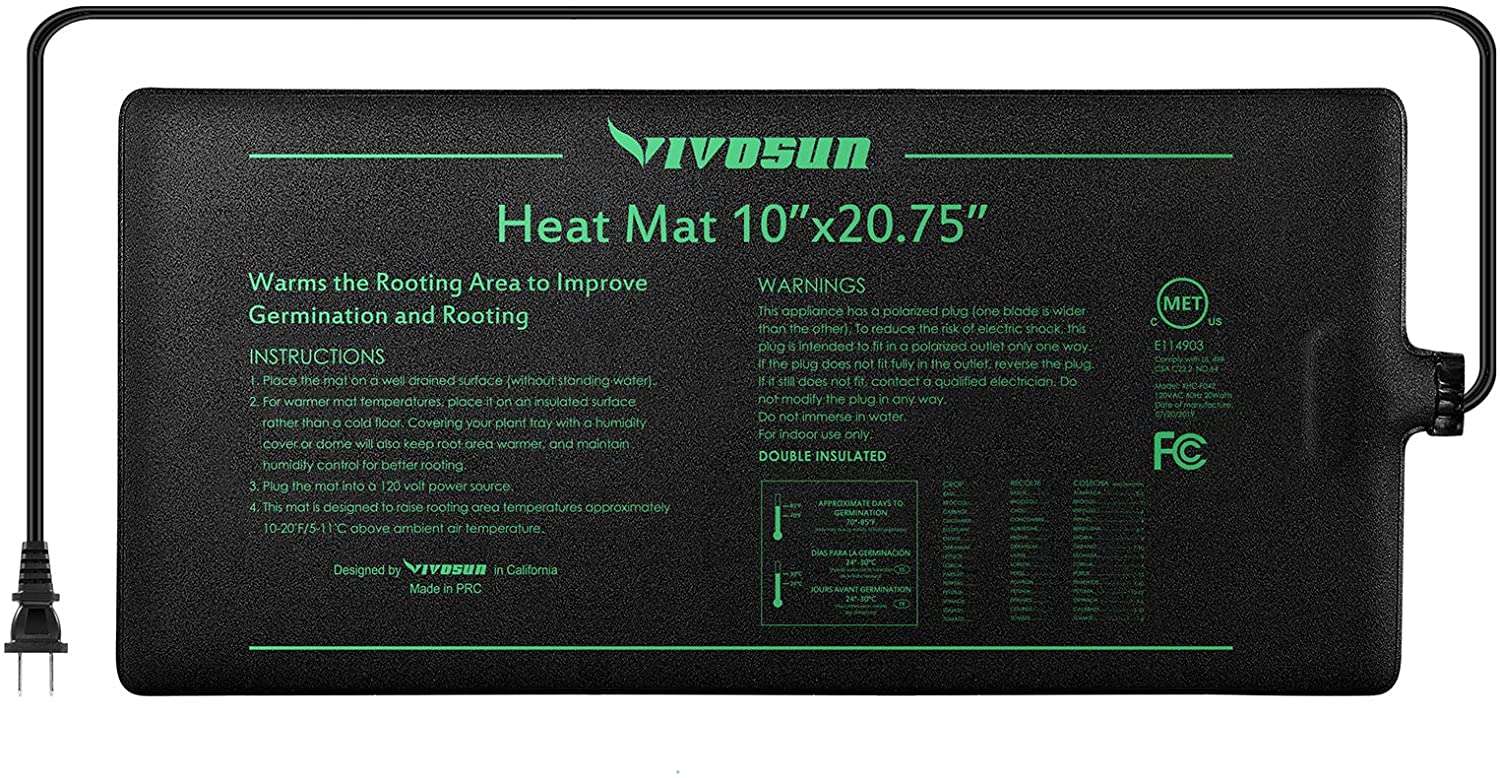
| LOVE this mat! I use it in the coop in the winter, then switch it over to my seedlings in the spring. It's wear-resistant and durable, so it's easy to clean when moving it from the coop to the house. |
*TIP #1: If you don’t have power in your coop, you can run an extension cord out there (I’ve been doing this for years).
*TIP #2: If you’re using a rollaway nest, it can get a bit trickier. My husband, Ryan, hardwired some heating elements into the collection tray. If you have questions about this part, ask away in the comments section! You can also see it in my Chicken Coop Winterizing YouTube video.
#5: Heat in the coop?
What a controversial topic! Some people heat their coop all winter long while others never heat it. So, what should you do?
I recommend never routinely heating for several reasons:
- Fire risk – I’ve heard WAYYY too many horror stories of people burning their coop down
- Your chickens never acclimate to the cold, so if the power goes out or the unit accidentally gets unplugged, your flock could die
- The chickens stay in the coop, rather than going out into the run. This means more moisture in the coop (which can lead to frostbite), and more poop that you ultimately have to clean up.
We don’t heat our coop unless it gets below -20F degrees; even still, our heater only raises the temp by 10 degrees or so. The point is just to avoid the danger zone, not create a balmy beach environment.
If you DO decide to heat your coop, make sure that you are using a safe option. Never use a heat lamp! We’ve used several different methods in the past, but radiant heat panels are my favorite. Safe, inexpensive, and energy efficient.
The Homesteading RD's Product Picks | |
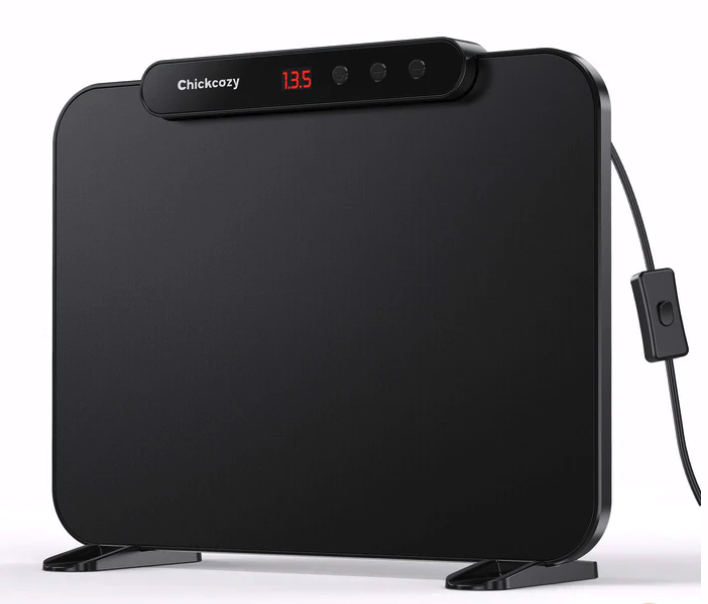
| This is the chicken coop heater that we use our new coop and we're running two of them. It's easy to set up, safe and efficient to run, and it comes with a remote control! Get an additional 5% off using my link below 🙂 |
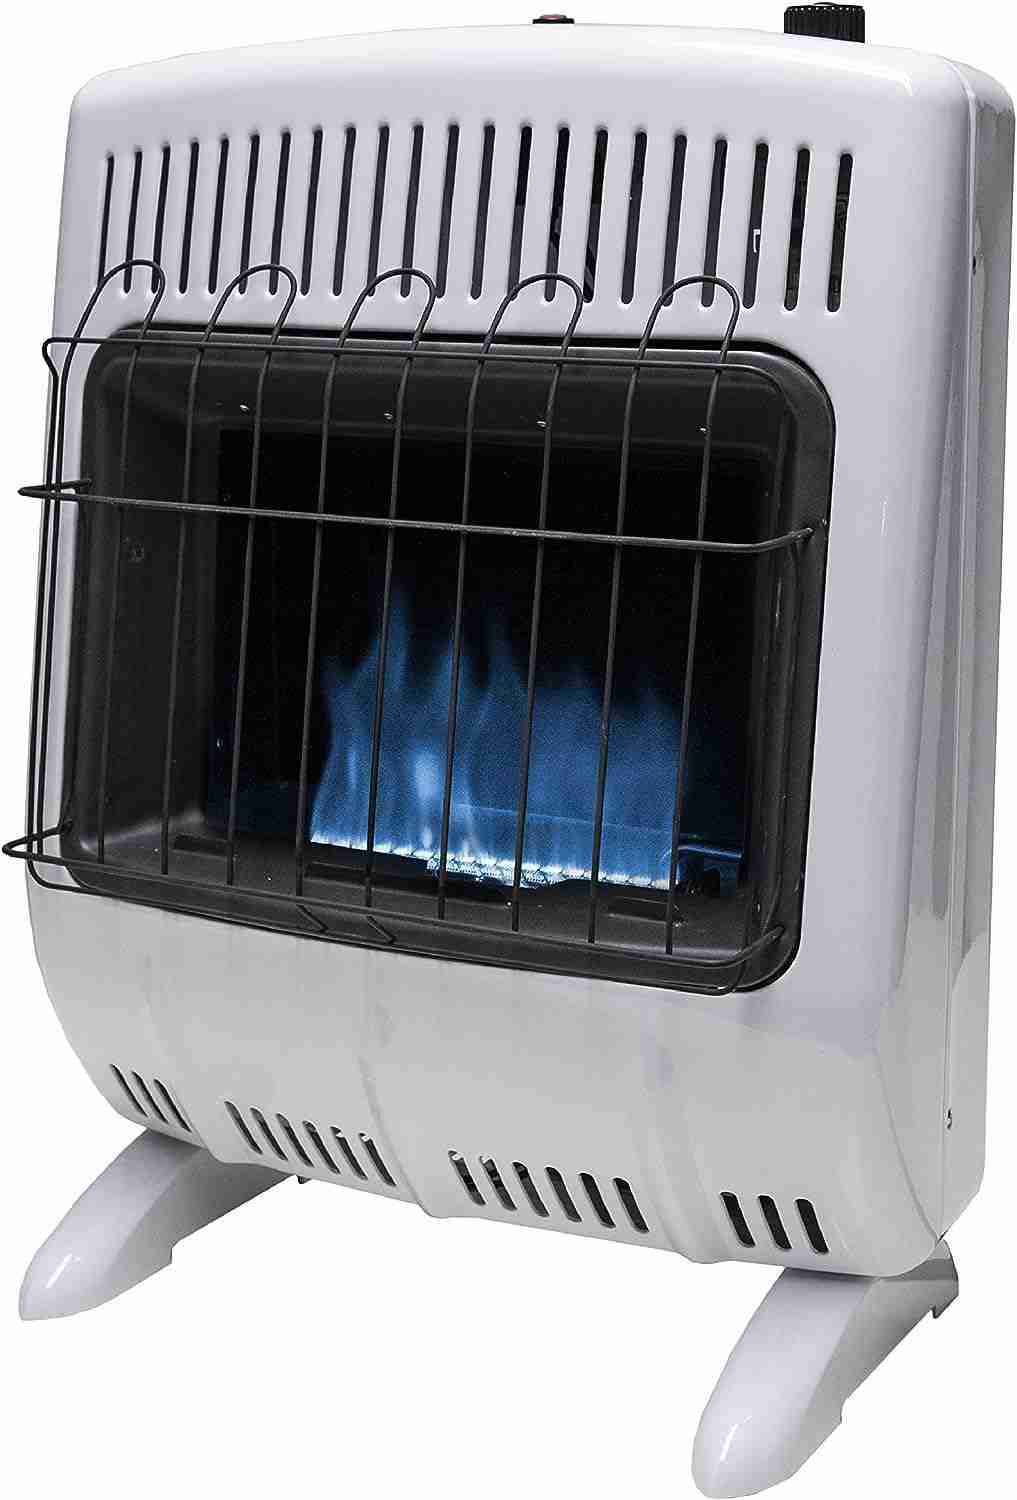
| If you have an extra propane tank, this might be a great option! We used this for several years. Easy to install as a wall mount and is 99.9% efficient. Vent-free and operates during power outages - without electricity |
#6: Proper roosting bars
We originally started with 2×2’s for roosting bars per my chicken book’s recommendation, however, my flock experienced some frost-bitten toes by the end of winter. This is because they were curling their toes around the square bar, leaving them dangling and exposed.
Once we swapped the 2×2’s out for 2×4’s (flat side up!), we rarely ever have an issue now. This ensures that their feet stay flat and covered by their insulating feathers on those frigid nights.
*TIP: Make sure that you carefully sand the corners off (no sharp edges or splinters, otherwise this can lead to bumblefoot) and have the flat side facing up!
Watch Me Winterize My Chicken Coop!
Are you a visual learner? Me too! Watch me go through all of these winterizing steps in our new chicken coop at our new homestead!
Other Chicken Articles You’ll Love:
- The 5 BEST Chicken Bedding Options
- Ultimate Guide to Chicken Coop Flooring
- Inside a Chicken Coop: 5 Required Items (and 3 to AVOID!)
- Ultimate Guide to Chicken Nesting Box Size
Final Thoughts
We covered a lot of great tips here for chicken coop winterizing! I hope you’re now feeling confident in the steps you need to take to keep your flock safe once those temps start to plummet. Stay warm!
Are you a first-time chicken keeper? Or maybe you don’t even have chickens yet? Definitely check out my ultimate resource: How to Care for Chickens: A Beginners Guide.
*Information in this article was referenced from personal experience and/or from my favorite chicken book Storey’s Guide to Raising Chickens unless otherwise noted.
The Homesteading RD's Product Picks: | |
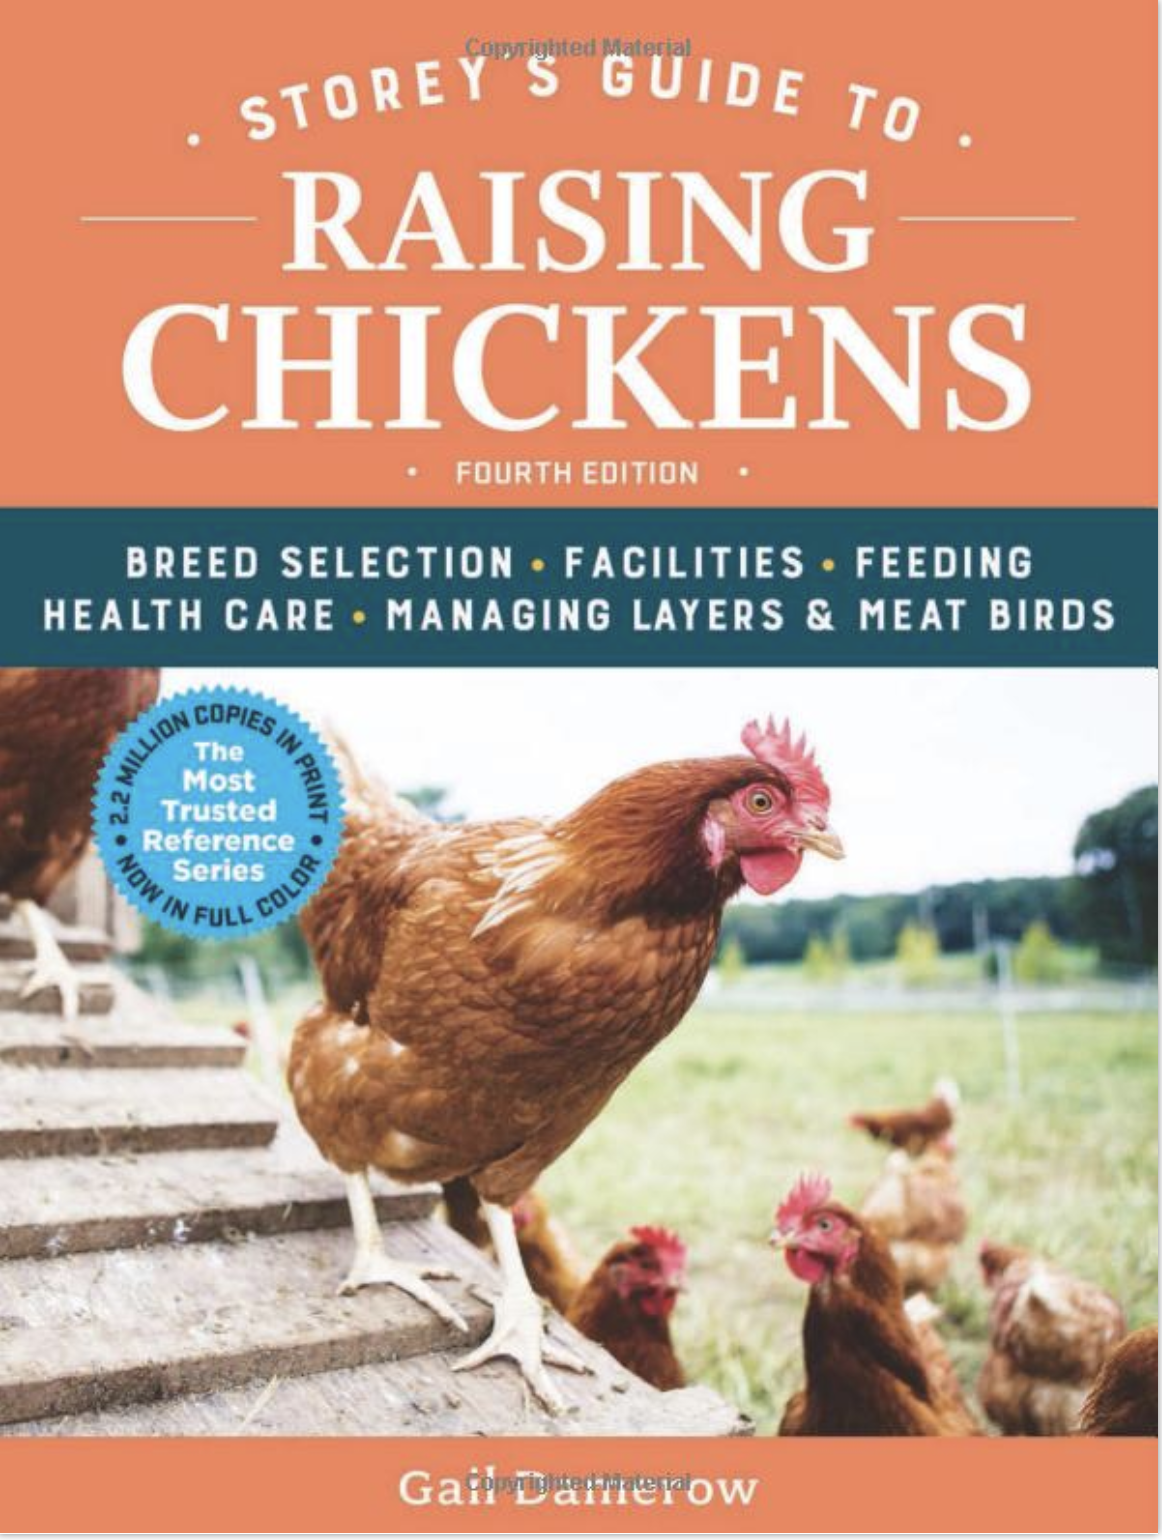
| This is THE chicken book to have! I've had my copy since the beginning and it's the one that I keep going back to time after time. It provides everything you need to know from coop design, hatching chicks, layer nutrition, and much more! |


Do you put anything over the seedling mats or just the mats? Like a nesting pad?
I put some bedding on top of the seedling mat
Hello and thank you for the information you are providing. Only one question please. We only just started with chickens. Using a home made coop that could manage 10 – 12 chickens. Temperatures here (on the Oregon Coast) are very mild but we feel the need to warm the coop on some nights. I have a heat lamp wired in that seems to work quite well, although I read here one should NEVER use a heat lamp. Can you let me know why? Thank you again.
We have a sweet Amerucana hatched this spring who always gets her “beard” wet when she drinks. Wondering how to handle this in the winter when it freezes? I can heat the water source, but don’t want her to get frostbite.
Ameraucana’s have very tight combs and wattles, especially the hens. She’ll be fine! I’ve rarely experienced frostbite in hens. Roosters, on the other hand, they have a tougher time.
Thank you for all the great tips! I will for sure be trying the seedling mats and covering my run! Do you wrap the entire run with plastic or do you leave some areas open for ventilation?
Awesome! It should help, for sure! I wrap the entire run, except for the south-facing door to let a little fresh air exchange 🙂
Thank you so much for these tips!! I would never have thought about using seedling mats to prevent the eggs from freezing! We’ve been having a big problem with that the last week and I have a couple of mats, so we’re going to put them out there today! Thank you so much!!!
They work so well! Good luck!
I honestly would’ve never thought about putting plastic up Lomg the run. I will def try that! Thanks for the tips!
It is a game changer! Much warmer in the run and the ladies like having a snow-free zone 🙂