
Garlic is a wonderful addition to the garden, and you’ll be surprised by how easy it is to plant and grow! As long as you follow the few key steps discussed in my article, your garlic will largely take care of itself until it’s time to harvest. I love a non-fussy plant!
The best part of growing garlic is that you only need to buy it once! From there, you can cultivate your own seed stock in the years to come and it will continually adapt to your garden conditions. The key is to pick the correct garlic type for you and your climate from the get-go. Let’s dive in!

*Disclosure: This post may contain affiliate links to products (including Amazon). I’ll earn a small commission if you make a purchase through my link, at no additional cost to you! Regardless, I only link to products that I personally use on our homestead or believe in.
Types of Garlic to Plant
Deciding on what type of garlic to grow is a HUGE decision, so don’t skip over this part! Once you commit to a type of garlic, you’ll use it for life since you’ll be able to cultivate your own seed stock from year to year.
Of course, you can start over with a different type of garlic later, but what a headache! Pick the right variety for you right out of the gate and you’ll be so thankful later.
Hardneck garlic
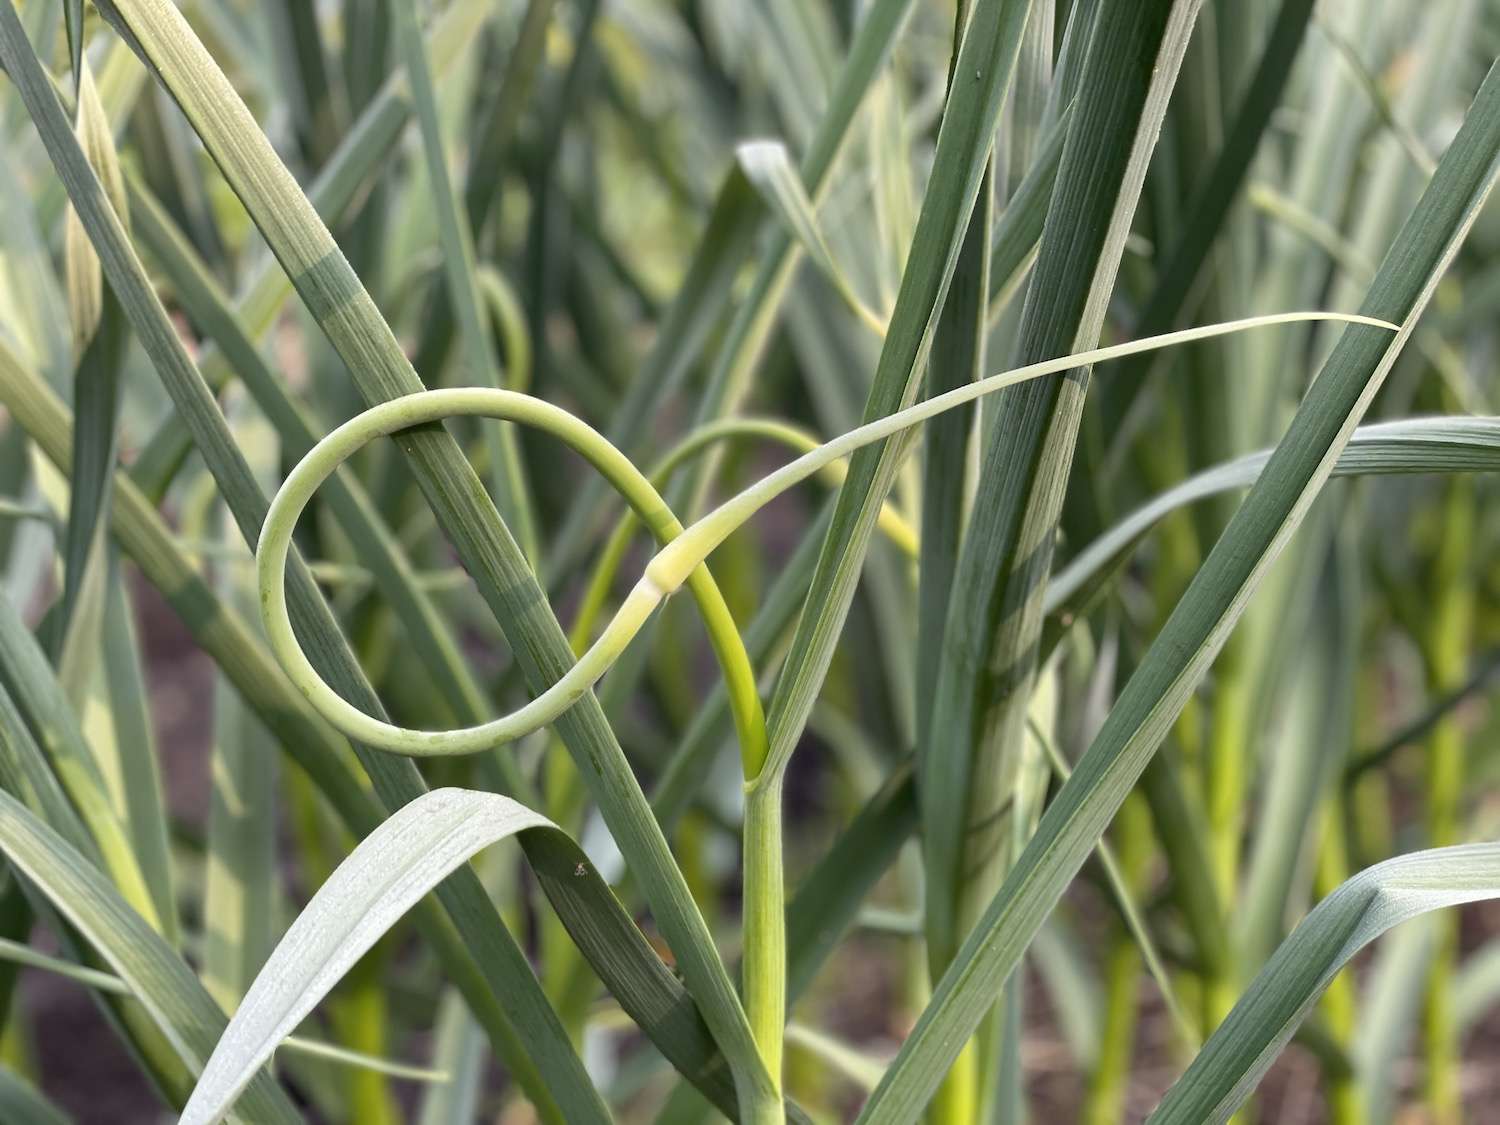
Hardneck garlic is mild in flavor and characterized by a single ring of cloves around a central hard stem that sends up a flower (garlic scape) about a month before harvest. We LOVE garlic scapes and look forward to harvesting them in late June here in Minnesota. *Read more about it here: When to Harvest Garlic Scapes (& How to Do It!).
This is the most popular type of garlic in my area (Minnesota, zone 4) because it’s very winter-hardy. Since garlic should be planted in the late fall, lay dormant all winter, and then emerge in the spring, it’s important to pick this type if you have harsh winters.
The one downside of hardneck garlic is that it doesn’t store quite as well as softneck garlic, but I’ve found that my Music garlic stays good for 10+ months as long as it is cured and stored properly (more on this later!).

Softneck garlic
Softneck garlic is bold in flavor and characterized by two rings of cloves around a soft stem, which can be braided for storage similar to onions. Unlike hardneck garlic, softneck does not produce a garlic scape, which is kind of a bummer!
While softneck garlic is a bit less hardy than hardneck garlic (making it best suited for warmer climates), it does excel at storing for long periods of time.
Elephant garlic
Elephant garlic is the least popular of the three types, but it is pretty fun to grow! As the name suggests, the cloves are HUGE and this type of garlic almost resembles a leek. Elephant garlic has a mild flavor that is easy to enjoy.
Where to Buy Seed Garlic
I recommend purchasing true seed garlic. Even though garlic isn’t grown from a seed, garlic cloves meant for planting are called seed garlic. You can purchase seed garlic through most seed suppliers, but my favorite is High Mowing Seeds. If you plan on growing garlic, order EARLY! Seed garlic is one to sell out quickly.

While you can technically try to grow grocery store garlic, it’s not recommended. Not only is it a total wild card as far as what type and variety it is, but often garlic bulbs are treated so that they don’t sprout. If that’s the case, then your garlic planting will be a bust.
Alternatively, if you’re buying organic garlic from a local farmer’s market, that should be fine. That’s garlic is grown locally and thus, should thrive in your garden as well. If it’s grown organically, it shouldn’t be treated, but always ask your farmer just to be sure!
When to Plant Garlic
Garlic is the outlier in the world of gardening. Instead of planting in the spring like everything else, garlic is planted in the fall. The key is to pick the right time when garlic sprouts a little bit in the fall, goes dormant all winter, fully emerges in the spring, and grows vigorously in the summer.
- If you plant too early, the garlic will grow too much and then when winter hits, it’ll cause damage.
- If you plant too late, the garlic won’t establish itself enough before winter hits, stunting its overall growth.
So how do you know? The best rule of thumb is to plant garlic about 1 month before the ground freezes solid. This is different than your first frost date. Our first frost date is September 23rd, but our ground doesn’t start to freeze solid until early November. So, I plant in early October!

This is also a great time to plant because most of your garden should be empty by now since it’ll be past your first frost. That means you’ll have some open spots available for planting. Wahoo!
How to Plant Garlic
Alright, you have your seed garlic on hand and it’s the right time to plant, so let’s do this! Thankfully, garlic is fairly easy to plant, but there are some hard and fast rules that you’ll want to be sure to follow.
Prepare the bed
First, make sure that the garden bed that you’re planning on planting garlic in is open. Remove any remaining plants, plant debris, and weeds. Then, amend the soil with 1-2″ of compost to replace nutrients that were lost in the previous season. If you did a soil test, be sure to add any other amendments that are indicated as well.

Garlic bulbs grow fairly deep in the soil, so if you have heavy clay soil like I do, I recommend loosening it up with a broadfork. *You can get one for 5% off with my code THRD5!
Prepare the bulbs
Next, you’ll need to prepare the garlic bulbs for planting. You don’t want to just plant the whole garlic head! First, start by carefully breaking each bulb apart into individual cloves. Do your best not to remove the protective layers. If this happens and some of the garlic flesh is exposed, simply set that one aside and enjoy it for dinner that week.
Now, lay all of the individual cloves out and start sorting from biggest to smallest. You’ll want to use the biggest and best cloves for planting since those will produce the biggest and best garlic bulbs the following year. Use the smaller cloves for eating this winter.

If you’re starting from scratch and have limited cloves to pick from, go ahead and plant all of them. In following years, when you have a garlic surplus to choose from, then you can start being picky.
Spacing and depth
You can squeeze a lot of garlic into a small space, which is great! Space each garlic clove 6″ apart. I like to use a grid pattern to be efficient with my garden bed. For my 3-foot wide beds, I plant 4 rows of garlic. My pro tip for spacing is to cut out a 6″ square piece of cardboard; it saves so much time!

Once the garlic cloves are laid out, plant them 2-3″ deep with the pointy side up! The growth will come out of the pointy end so be sure not to point that side down or you’ll grow garlic upside down – oops! If there’s no rain in the forecast, water the cloves in.

Mulching
Lastly, it’s important to mulch the garlic cloves so that they’ll be protected throughout the depths of winter. I wait about 2 weeks after planting before adding mulch. That way the cloves will get a touch of heat to get going right away, but then will be insulated before winter really sets in.
Watch me plant garlic on YouTube!
Growing Garlic
Thankfully, garlic is a pretty hardy plant that doesn’t require much throughout the growing season. Much of its lifespan is spent in dormancy during winter. In early spring, you’ll notice the growing tips popping through the mulch (as long as you selected the right kind of garlic for your climate and it survived the winter).
At this point, there’s nothing to do as long as you already added compost in the fall when planting. If you didn’t do this, remove the mulch, lay down 1-2″ of compost, and replace the mulch.
If you’re growing hardneck garlic, be on the lookout for garlic scapes in early summer. Make sure to harvest them right as they start to curl. Not only are they delicious to eat, but removing them will ensure that you get bigger garlic bulbs. If you leave the scapes on, they’ll form a flower stalk which diverts energy from bulb development.
Harvesting Garlic
This part is important to get right. If you harvest too soon, the garlic bulbs won’t be fully developed. If you harvest too late, the bulbs will start to split apart and the skins will crack, and then they won’t store well.
- Hardneck garlic: Harvest once the bottom 2-3 sets of leaves have started to turn yellow. This is usually 4 weeks after you’ve harvested the garlic scapes.
- Softneck garlic: Harvest when the tops have fallen over.
- Elephant garlic: Harvest when the tops have fallen over.
The bulbs are buried a few inches in the soil, so don’t just yank them out of the ground. This can damage the necks and bulbs. Instead, I like to use a shovel or a pitchfork to gently pry them up. Just be careful not to pierce the bulbs!
Watch me harvest garlic on YouTube!
Curing and Storing Garlic
Once you’ve harvested your garlic, you’ll need to cure it if you want to store them long-term. First, gently brush off any big clumps of dirt, but leave the rest. You don’t want to damage the protective papery skins and any remaining dirt will fall off as the bulbs dry and cure.
The curing step is a bit controversial. Most people lay out their garlic to cure in a garage or covered porch (in the shade) with a fan for good airflow. I’ve always cured my garlic in a garden wagon set out in the sun and have had great success! I also love this method because I don’t have to create some elaborate racking system.
I think it all comes down to your climate. In a cool, northern climate, sun is fine. In a hot, southern climate, I’d go with shade. The key is that there is good airflow to ensure a proper cure. Leave them out to cure for 2-3 weeks. They should be completely dry by then.

Then, cut the stems to 1″ long and trim the roots to 1/4″ long. At this point, I like to sort my garlic bulbs into two piles. One pile of the largest and best bulbs for planting later on in the fall and one pile of the smaller ones that’ll go into storage for eating the rest of the year.
Store the cured garlic bulbs in a mesh bag in a cool (45-60F), dry place. If you don’t have these exact conditions, it’s okay. Just do your best! A root cellar, basement, or heated garage is awesome if you have one.
*Consider making a batch of my Fermented Honey Garlic with your homegrown garlic right before cold and flu season! It’s amazing!
Other Gardening Articles You’ll Love:
- When to Harvest Garlic Scapes (& How to Do It!)
- When to Harvest Butternut Squash
- Using Mulch in the Garden: A Comprehensive Guide
- 5 Winter Tasks Every Gardener Should Do
*Are you interested in starting a garden, but you’re overwhelmed with where to start? Or maybe you’ve tried a garden in the past, but it flopped? Definitely check out my course How to Plan a Garden: Step-By-Step! Don’t forget my discount code “GARDEN” for 10% off!


Katie,I haven’t been able to open your videos for some time.
What do I have to do to get them on U tube? We enjoy watching them.