
Fermented carrot sticks are delicious, nutritious, and SUPER simple to make! Move over boring raw carrot sticks; these are so much more fun, tasty, and great for your gut health, too. You’re going to LOVE them!
In this recipe, I’ll share with you my favorite way to make them, plus some other fun ways to spin it with different flavor add-ins that you can experiment with. The options are endless!

*Disclosure: This post may contain affiliate links to products (including Amazon). I’ll earn a small commission if you make a purchase through my link, at no additional cost to you! Regardless, I only link to products that I personally use on our homestead or believe in.
Why Make Fermented Carrots?
Preserve your harvest
While raw carrots can last 6-9 months in the fridge (if stored properly), fermentation increases their storage time even further to a whopping 12 months! Fermentation is such an underrated form of food preservation. Let’s bring it back!

Nutritional boost
Canning, freezing, and dehydrating are great, but the trade-off for these methods of food preservation is a slight loss in nutritional value. However, in fermentation, this method actually increases the nutritional value of that food!
- Lactic acid bacteria actually can synthesize b-vitamins.
- The existing vitamins and minerals are more absorbable than if you ate the produce raw. That’s because the tough cellular walls of the vegetables are broken down during the fermentation process.
- Lastly, there are all of those lovely probiotics!
They are delicious!
We absolutely loooooove fermented carrot sticks here on our homestead. Since they are cut into sticks, they are an easy grab-and-go snack that everyone is sure to love. They are tangy, crunchy, and always seem to hit the spot! They are great as a side dish, too.
*Some other ferments you can try: Fermented Turnips (Sauerruben), Fermented Eggs, and Fermented Hot Sauce
Fermented Carrots Recipe

Tools
- Fermentation vessel – I like to use wide-mouth quart-size mason jars since it’s just the two of us, but you could use half-gallon mason jars if you have a large family. Fermentation crocks work great, too!
- Fermentation lid – They are easy to clean and won’t rust while allowing your ferment to “burp” itself as needed (AKA no exploding jars). In a pinch, you can set a loose canning lid on top, but don’t screw down the band!
- Fermentation weight – These keep your ferments submerged under the brine, which reduces the risk of mold growth. You can get creative here, but the glass weights work wonderfully.
Ingredients
- Whole, raw carrots – fresh from your own garden, if possible!
- Sea salt – I like to use a mineral-rich salt like Redmond Real Salt. Avoid iodized salt for ferments!
- Water – well, distilled, or filtered
- Optional for additional flavor: garlic clove, bay leaf, rosemary sprig, lemon slice, coriander seed, mustard seed, etc.
How to make fermented carrots
Step 1: Fill the jars
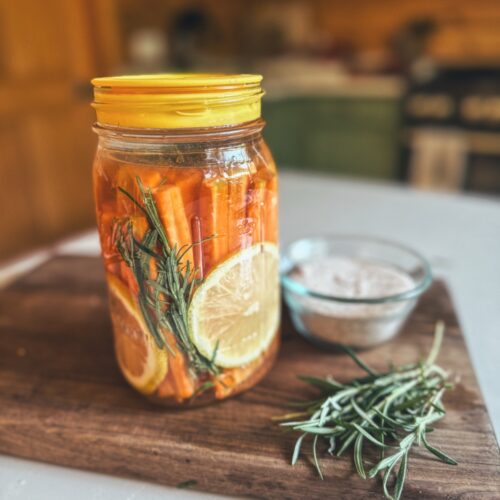
Peel and slice freshly washed carrots into long sticks, about 3/8″ in diameter. Make sure that they are the right length for your fermentation vessel and that there’s enough room for your fermentation weight on top. I use quart-size mason jars, so I cut 1 carrot stick to 4.75″ long and then use that as my guide as I slice the rest.

Add the carrot sticks to a clean fermentation vessel, continuing to add them until they are quite snug. A snug fit will help keep them firmly in place, rather than floating around toward the surface of the jar, which can lead to mold growth. If you want to add garlic or rosemary for additional flavor, tuck those in as well, and then place the fermentation weight on top.

Step 2: Add the brine
Mix up the brine by adding 1 Tbsp of sea salt to 2 cups of room temperature, non-chlorinated water and mixing until dissolved. If you’re using a large fermentation vessel, you may need to double or triple this brine recipe. Some people like to warm up the solution slightly, but I’ve found a whisk works just fine to get it to dissolve. Too much heat can disturb the fermentation process, so I just stick with room temperature brine.
Pour the brine over the carrot sticks and fermentation weight until the brine reaches the very top lip of your fermentation vessel. Don’t underfill; otherwise, that can increase the risk of mold growth! I made that mistake my first year of fermenting – oops! Reserve any extra brine and secure a fermentation lid on top.

Step 3: Let it ferment
Move the container to a cool, dark location where it will be undisturbed for 7-14 days. Placing the container(s) on a plate or tray can help catch anything that dribbles over as it bubbles during the fermentation process. Keep an eye on the brine level and top it off with the reserved extra brine, if needed.
Once the brine starts to get cloudy and the carrot sticks start to lose their vibrant color, you know that fermentation is on its way. By day 7, begin tasting the fermented carrot sticks to decide if they are “ready” or not. Look for a sour pickle taste that is pleasing, but not too acidic like vinegar.
Step 4: Store
Once the fermented carrots have reached the stage to your liking, transfer the jar(s) to the refrigerator. This stops the fermentation process so that they don’t keep fermenting until they turn into inedible mush. Once in the fridge, they will last up to a year!
FAQ About Making Fermented Carrots
Do I have to peel carrots to ferment them?
No, you don’t have to peel them if you don’t want to or if you are short on time. I recommend it because the peel can sometimes impart a bitter flavor that I personally don’t want transferring into my ferments.
What do fermented carrots taste like?
Fermented foods are kind of hard to describe, but I would compare a raw carrot to fermented carrots as you would raw cabbage to sauerkruat. The texture is a bit softer, and there’s that tangy flavor from the fermentation. The carrot flavor is still there, but it is milder than before. If you decide to add the optional add-ins like rosemary and/or lemon slices, those flavors will be amplified in the carrots as well.
How do you prevent mold in fermented carrots?
I’ve learned a lot about mold through my years of experimenting with fermentation. First of all, not all mold is bad! If it’s greenish or greyish, it’s typically a safe kind of mold that can be skimmed off. However, if it’s black, pink, orange, or if the ferment itself seems “off” (taste, smell, appearance), toss it into the compost pile.
So, how can you prevent mold? Cleanliness is the first step – make sure that you’re cleaning your fermentation vessel and working with clean hands and utensils. You don’t need to fully sanitize everything (bleach, boiling, etc.), but a fresh washing with dish soap should do it. Second, ensure that your ferment stays submerged underneath the brine by using a fermentation weight and maintaining an adequate level of brine. Top it off with additional brine through the fermentation process, if needed. Lastly, I’ve found that adding brine to the very top lip of the jar so that there’s no air gap in my fermentation vessel is key.
Other Fermentation Recipes You’ll Love:
- Homemade Fermented Hot Sauce
- Fermented Turnips Recipe (Sauerruben)
- Fermented Eggs Recipe
- Fermented Honey Garlic

Fermented Carrot Sticks
Equipment
- Fermentation vessel I like wide mouth quart-size mason jars
Ingredients
- 1 ½ lb Raw carrots
- 1 tbsp Sea salt
- 2 cup Water well, distilled, filtered
- Optional for additional flavor: garlic clove, bay leaf, rosemary sprig, lemon slice, coriander seed, mustard seed, etc.
Instructions
- Peel and slice freshly washed carrots into long sticks, about 3/8" in diameter and 4 ¾" long (if using quart size jars).
- Add the carrot sticks to a clean fermentation vessel, continuing to add them until they are quite snug. If you want to add garlic or rosemary for additional flavor, tuck those in as well.
- Place the fermentation weight on top.
- Mix up the brine by adding 1 Tbsp of sea salt to 2 cups of room temperature, non-chlorinated water and mixing until dissolved. If you're using a large fermentation vessel, you may need to double or triple this brine recipe.
- Pour the brine over the carrot sticks and fermentation weight until the brine reaches the very top lip of your fermentation vessel. Reserve any extra brine.
- Secure a fermentation lid on top of the jar.
- Move the container to a cool, dark location where it will be undisturbed for 7-14 days.
- By day 7, begin tasting the fermented carrot sticks to decide if they are "ready" or not. Look for a sour pickle taste that is pleasing, but not too acidic like vinegar.
- Once the fermented carrots have reached the stage to your liking, transfer the jar(s) to the refrigerator where they will keep for up to a year!
Notes
- A snug fit will help keep the carrot sticks firmly in place, rather than floating around toward the surface of the jar, which can lead to mold growth.
- Don't underfill the jar with brine; otherwise, that can also increase the risk of mold growth. You want as little of an air gap as possible.
- Placing the container(s) on a plate or tray can help catch anything that dribbles over as it bubbles during the fermentation process. Keep an eye on the brine level and top it off with the reserved extra brine, if needed.
Nutrition

Hello, once the fermentation period is up and you move the carrots to the fridge do you replace the lid with a regular lid or keep the fermentation lid on? Thank you in advance!
I personally leave the fermentation lid on since regular canning lids will corrode.
Wow. I didn’t even know you could do this with carrots. And I had a whole bag I was worried would spoil any time now. Thanks
Enjoy! 🙂
I really enjoyed reading your post on fermented carrot sticks. The way you explain both the preservation benefits and the nutritional upside makes the recipe feel accessible and health-wise. I appreciate how you include clear steps and helpful tips for beginners, like ensuring the carrots stay submerged in the brine. I’m excited to try this myself and experiment with some of the flavor add-ins you suggested. Thank you for sharing such a practical and well-explained guide!
I’m so glad to hear it! 🙂 Thanks for your kind words